
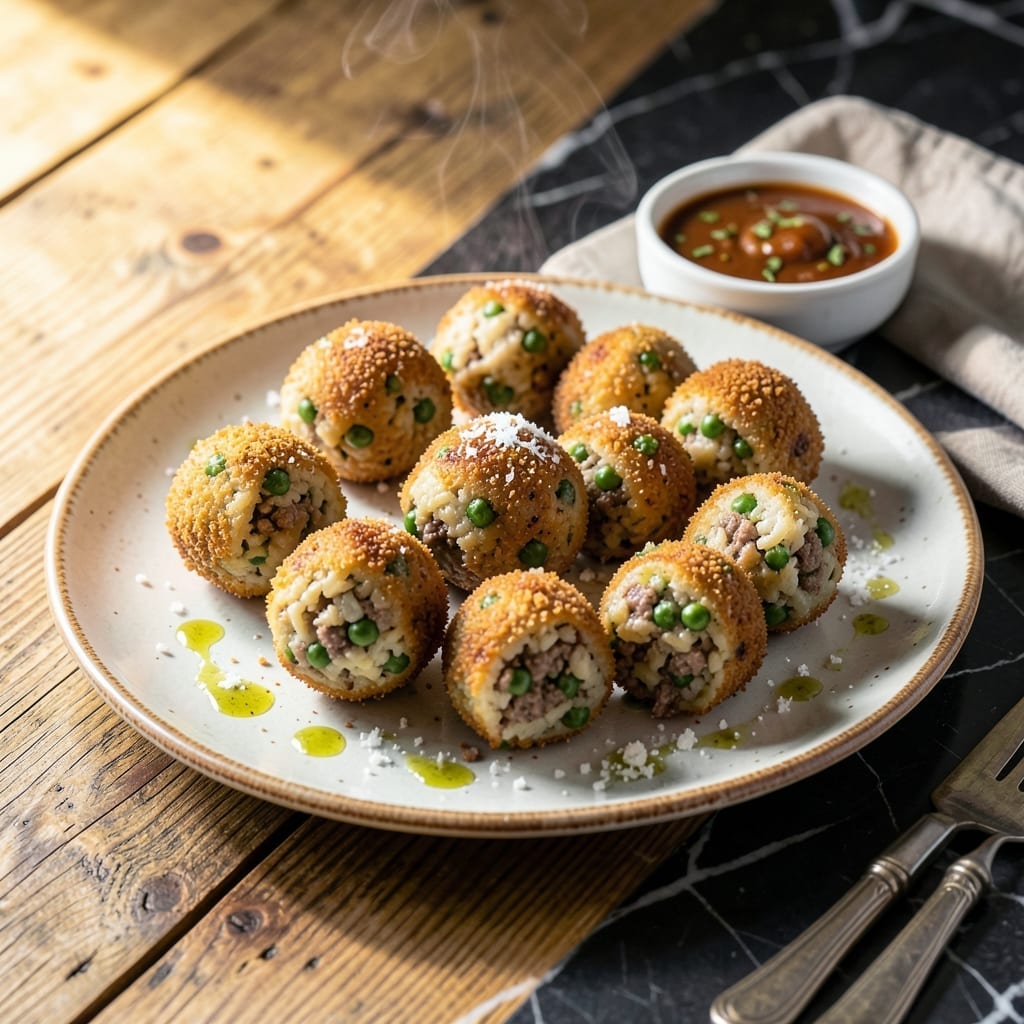
I first tasted these golden, crispy orbs at my Nonna’s tiny kitchen table, where she’d fry them in batches while telling stories of Sicily. This recipe transforms simple risotto into a handheld masterpiece with a savory meat and pea filling.
The secret lies in chilled rice that holds its shape and a lightly breaded exterior that fries to a perfect golden crunch. Each bite reveals a tender center with herbed ground meat and sweet peas, a nod to traditional Sicilian flavors.
What you’ll achieve is a dish that’s as satisfying to make as it is to eat, with a texture that’s crispy outside and creamy inside. Serve warm for the best experience.
Perfect for appetizers or a hearty snack, these rice balls bring a taste of Italy to your table with every bite.
Ingredients for Italian Rice Balls Recipe with Meat and Peas
Golden Sicilian flavors start with chilled risotto, herbed meat, and sweet peas. Simple but spectacular.
| Ingredient | Amount | Notes |
|---|---|---|
| Arborio Rice 🍚 | 2 cups | For risotto base, chilled overnight |
| Ground Beef 🥩 | ½ lb | Leaner blend for filling |
| Frozen Peas 🌱 | ½ cup | Thawed and drained |
| Yellow Onion 🧅 | ½ whole | Finely diced for filling |
| Garlic Cloves 🧄 | 2 cloves | Minced for depth |
| Chicken Broth 💧 | 4 cups | For cooking rice |
| Parmesan Cheese 🧀 | ½ cup | Freshly grated for rice |
| Large Eggs 🥚 | 2 whole | For breading binder |
| Breadcrumbs 🍞 | 1 ½ cups | Italian-style preferred |
| All-Purpose Flour 🌾 | ½ cup | For dredging rice balls |
| Fresh Parsley 🌿 | ¼ cup | Chopped for filling |
| Olive Oil 🫒 | 1 cup | For frying golden crisp |
| Salt 🧂 | 1 tsp | To taste for seasoning |
| Black Pepper 🌶️ | ½ tsp | Freshly ground preferred |
| Dried Oregano 🍃 | 1 tsp | For Sicilian flavor |
The rice is everything here. Arborio from the bulk section at Whole Foods or any Italian market works perfectly—just make sure it’s chilled completely overnight (or at least 4 hours) so it holds shape. For the meat, 80/20 ground beef gives the best flavor, but leaner works too. I grab mine from Costco for big batches. The peas? Frozen is actually better than fresh here (trust me on this).
No Arborio? Carnaroli or Vialone Nano are great swaps—all that creamy starch is key. Out of beef? Ground pork or Italian sausage adds amazing depth. Skip the peas? Finely chopped mushrooms or spinach work too. The breadcrumbs can be panko for extra crunch (I always have a bag of Progresso on hand). And if you’re feeling fancy, a pinch of saffron in the rice takes this to next-level Sicilian.
These fry up best fresh, but you can prep the rice balls ahead—keep them chilled until ready to cook. Leftovers? Reheat in a 350°F oven for 10-15 minutes to revive the crunch. They’ll keep in the fridge for 2-3 days (though they rarely last that long).
Why You’ll Love This Recipe
- One Pot Wonder: I love that everything cooks together—Arborio rice soaks up the beef and pea flavors while the onion and garlic do their magic in the same pan.
- That Crispy Crunch: The outside gets golden and crisp while the inside stays creamy, with little bursts of sweet peas and savory beef in every bite.
- Feeds a Hungry Crowd: I make a big batch for family dinners and everyone—even the picky ones—goes back for seconds.
- Leftovers for Days: Honestly, they taste even better the next day, and they reheat like a dream for quick lunches.
Step-by-Step Instructions for Italian Rice Balls With Meat and Peas
These steps transform simple ingredients into crispy, flavor-packed arancini that taste like Sicily.
Step 1: Cook and Chill the Risotto Base
In a large pot, bring the 4 cups Chicken Broth to a gentle simmer. In a separate heavy-bottomed pot, toast the 2 cups Arborio Rice in a little of the olive oil for 2 minutes until translucent at the edges. Begin adding the hot broth 1 cup at a time, stirring constantly.
After 18-20 minutes, when the rice is creamy but still slightly firm, remove from heat. Stir in the 0.5 cup Parmesan Cheese, then spread the risotto on a baking sheet to cool completely. Refrigerate for at least 2 hours or overnight—this firm texture is essential for shaping.
Step 2: Prepare the Herbed Meat and Pea Filling
In a skillet, cook the 0.5 lb Ground Beef over medium heat until browned, about 5-6 minutes. Add the finely diced 0.5 whole Yellow Onion and cook until soft, then stir in the minced 2 cloves Garlic Cloves for 30 seconds until fragrant.
Add the thawed and drained 0.5 cup Frozen Peas, the 0.25 cup Fresh Parsley, 1 tsp Salt, 0.5 tsp Black Pepper, and 1 tsp Dried Oregano. Cook for another 2-3 minutes, then set aside to cool completely. This filling should be moist but not wet to prevent soggy arancini.
Step 3: Shape and Fill the Rice Balls
With wet hands, take a handful of cold risotto—about ⅓ cup—and press it into a flat disc in your palm. Place 1 tablespoon of the meat and pea filling in the center. Gently mold the risotto around the filling, pressing lightly to seal completely. You should have about 12-14 balls.
If the rice sticks, dip your hands in cold water between each ball. The risotto must be firm enough to hold its shape—if it’s too soft, return it to the fridge for another 30 minutes. Uniform sizes ensure even cooking.
Step 4: Bread and Fry to Golden Perfection
Set up a breading station with three shallow dishes. Place the 0.5 cup All-Purpose Flour in the first, beat the 2 whole Large Eggs in the second, and put the 1.5 cups Breadcrumbs in the third. Roll each rice ball first in flour, shaking off excess, then dip in egg, and finally coat thoroughly in breadcrumbs.
Heat 1 inch of the olive oil in a deep pot to 350°F. Fry the arancini in batches for 3-4 minutes until golden brown on all sides, turning occasionally. Drain on a paper towel-lined plate. The oil temperature is critical—too cool and they’ll absorb oil, too hot and they’ll brown before cooking through.
Pro Tips For Making Italian Rice Balls Recipe With Meat And Peas
- Cool the Rice: Spread the cooked Arborio rice on a tray for 10 minutes before shaping—it firms up just enough to stop the balls from collapsing when you fry them.
- Sauté the Peas: Thaw the frozen peas first, then sauté them with the onion and garlic for 2 minutes to drive off excess moisture and keep the filling from turning mushy.
- Skip Raw Beef: Fully cook and drain the ground beef before mixing it into the rice; undercooked meat in the center is the fastest way to ruin a batch.
- Use Cold Hands: Wet your hands with cold water before shaping each rice ball—it prevents sticking and makes the process way less frustrating.
Storing and Reheating This Recipe
Refrigerator Storage
Let your arancini cool completely before storing—they’ll keep in an airtight container in the fridge for up to 3 days. I use glass containers with snap-tight lids from my local Italian deli for this. The flavors meld beautifully overnight, making leftovers almost as good as fresh. ❄️
Freezing for Later
For longer storage, freeze uncooked, breaded rice balls on a baking sheet first to prevent sticking. Once solid, transfer to a freezer bag—they’ll last up to 2 months. I’ve found this works perfectly in my tiny Boston apartment freezer. Label with the date to track freshness.
Oven Reheating
Preheat your oven to 375°F and place arancini on a baking sheet lined with parchment. Heat for 10-12 minutes, flipping halfway, until crispy and warmed through. This method preserves the texture better than microwaving. 🔥
Air Fryer Option
For a quicker reheat, use an air fryer at 350°F for 5-6 minutes, shaking the basket once. This revives the crunch without adding extra oil. I tested this in my Ninja Foodi with great results.
Avoid the Microwave
While it’s tempting for speed, microwaving will make your arancini soggy. If you must, use 50% power in 30-second bursts and finish in a toaster oven to recapture some crunch.
Nutrition Facts
Frequently Asked Questions
Can I use leftover risotto for this?
In fact, day-old risotto works perfectly since it’s already chilled and firm. Just ensure it’s not too dry—add a splash of broth if needed before shaping.
Why does my filling leak out during frying?
This usually means the risotto wasn’t cold enough or the filling was too wet. Seal the edges tightly and chill shaped balls for 30 minutes before frying to prevent leaks.
Can I bake instead of fry?
Yes! Bake at 375°F for 20-25 minutes, turning halfway. Brush with oil first for extra crispiness. The texture won’t be identical but still delicious.

- Mujadara Rice and Lentils Recipe: Earthy Spiced Lentils With Caramelized Onions - November 1, 2026
- Naija Fried Rice Recipe: Street-Style Spice With Veggie Crunch - November 1, 2026
- Mushy Rice Recipe: Fluffy Grains Transformed in Minutes - November 1, 2026