
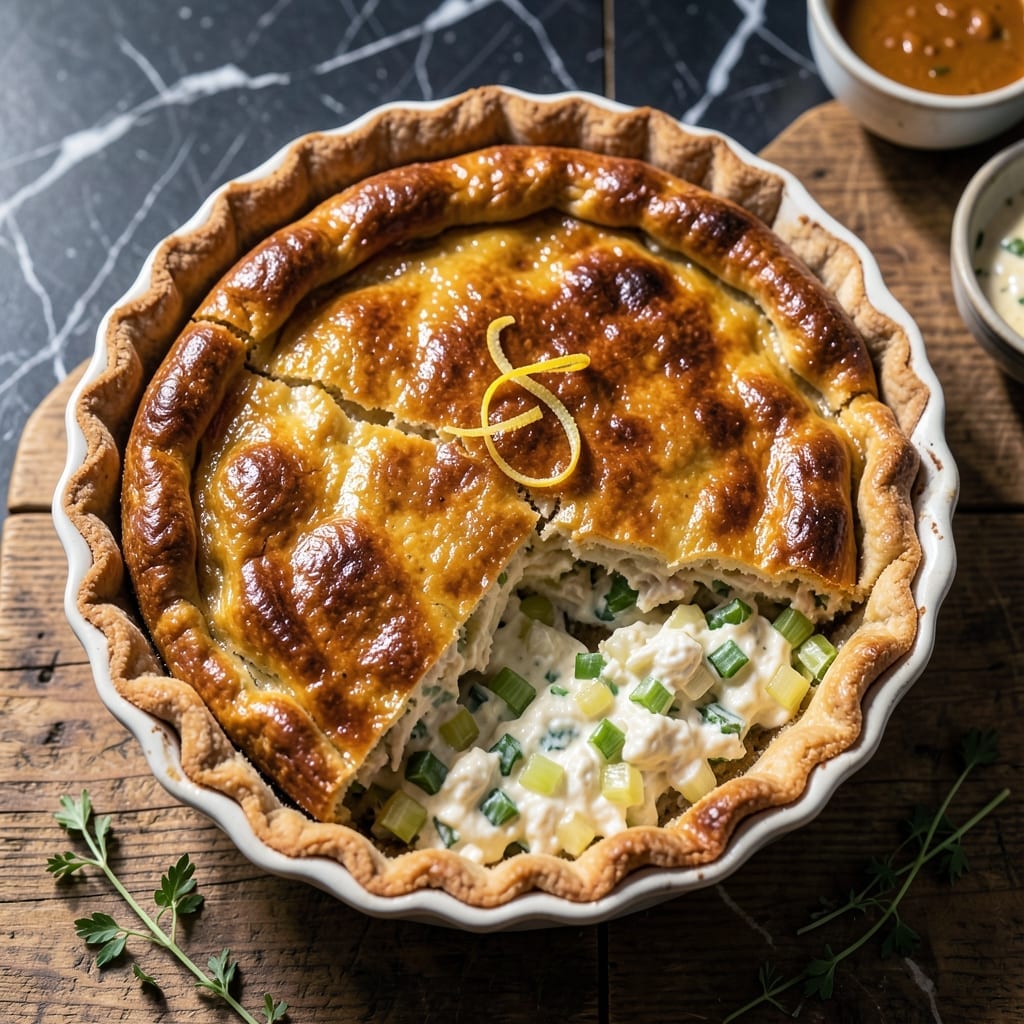
I’ve spent years perfecting savory pies, and this one combines the best of comfort food with elegant presentation. The secret lies in balancing tender chicken, fresh vegetables, and a creamy filling that doesn’t overwhelm the flaky crust.
What makes this dish special is the texture contrast: crisp golden pastry gives way to a rich, creamy interior with just the right amount of crunch from celery and onions. The baking time ensures everything comes together perfectly without drying out.
You’ll end up with a pie that holds its shape when sliced, revealing layers of filling encased in that flaky pastry. It’s impressive enough for company but simple enough for a weeknight when you want something extraordinary.
Serve warm with a light green salad to cut through the richness. The crust stays crisp for hours, making it perfect for gatherings.
Ingredients for Chicken Salad Pie
Flaky crust meets creamy chicken filling with a satisfying crunch. Probably have most already.
| Ingredient | Amount | Notes |
|---|---|---|
| Pie Crust 🥧 | 2 sheets | Store-bought or homemade flaky |
| Cooked Chicken Breast 🍗 | 2 cups | Shredded or diced |
| Celery 🥬 | 1 cup | Finely diced for crunch |
| Yellow Onion 🧅 | ½ cup | Finely diced |
| Mayonnaise 🥫 | ¾ cup | Full-fat for creaminess |
| Sour Cream 🥛 | ¼ cup | Adds tangy richness |
| Dijon Mustard 🟡 | 1 tbsp | For depth of flavor |
| Lemon Juice 🍋 | 1 tbsp | Freshly squeezed preferred |
| Dried Tarragon 🌿 | 1 tsp | Or fresh if available |
| Salt 🧂 | ½ tsp | Kosher or sea salt |
| Black Pepper 🌶️ | ½ tsp | Freshly ground preferred |
| Frozen Peas 🌱 | ½ cup | Thawed and drained |
| Large Egg 🥚 | 1 whole | For egg wash |
| All-Purpose Flour 🌾 | 1 tbsp | For thickening if needed |
The crust is everything here. Pillsbury refrigerated sheets are my go-to for convenience—they bake up perfectly flaky every time. If you’re making your own, use cold butter (the colder, the better) and don’t overwork the dough. For the chicken, rotisserie chicken from Costco saves a ton of time, but poached breasts work just as well. Look for vibrant green celery with crisp stalks—no limpness allowed.
No tarragon? Dried dill at half the amount gives a similar vibe. Greek yogurt can swap for sour cream (use the full-fat version). If you’re out of Dijon, yellow mustard plus a pinch of cayenne gets you close. The peas are optional but add a nice pop of color and sweetness. For extra richness, stir in a handful of shredded cheddar before baking.
Assemble the pie just before baking—no soggy crust. Keeps in the fridge for 2-3 days (reheat in the oven to crisp the pastry). Freezes beautifully for up to 2 months (thaw overnight before reheating). Leftovers? They disappear fast (worth the extra minute to make two).
Why You’ll Love This Recipe
- One Bowl Wonder: I dump everything—shredded chicken, celery, onion, and mayo—right into the crust and bake. No extra bowls, no fuss.
- That Crunch: The buttery pie crust with the crisp celery and onion gives every bite this addictive texture. Honestly, it’s the best part.
- Picnic Ready: I pack this for potlucks, work lunches, or even a quick dinner. It travels well and tastes great cold or warm.
- Leftovers for Days: One pie feeds us twice, and the flavor actually gets better overnight. I’ll be real: I make it just for the next-day slices.
Step-by-Step Instructions for Chicken Salad Pie
Here’s how I make this savory bake with a perfectly flaky crust every time.
Step 1: Prepare the Savory Chicken Filling
In a large bowl, combine the 2 cups cooked chicken breast, 1 cup celery, and 0.5 cup yellow onion. I like to dice the celery and onion finely so every bite has consistent texture without overpowering the chicken.
Add the 0.75 cup mayonnaise, 0.25 cup sour cream, 1 tbsp Dijon mustard, 1 tbsp lemon juice, 1 tsp dried tarragon, 0.5 tsp salt, and 0.5 tsp black pepper. Mix until everything is well coated and evenly distributed.
The filling should be creamy but not soupy. If it seems too wet, sprinkle in the 1 tbsp all-purpose flour to thicken it slightly. Fold in the 0.5 cup frozen peas last—they add a pop of color and sweetness.
Step 2: Assemble the Pie with Bottom Crust
Preheat your oven to 375°F. Unroll 1 sheet pie crust and press it gently into a 9-inch pie dish, allowing the edges to overhang slightly. I don’t trim the excess yet—it makes sealing the top crust easier later.
Spoon the chicken salad mixture into the crust, spreading it evenly and pressing down lightly to eliminate air pockets. You’ll have a generous amount of filling, so mound it slightly in the center—it will settle as it bakes.
Here’s the thing—don’t pack it too tightly, or the filling might burst through the top crust as it heats. Just distribute it evenly and let it be.
Step 3: Add Top Crust and Seal
Unroll the second sheet pie crust and place it over the filling. Trim the edges to leave a ½-inch overhang, then fold the bottom crust edges over the top and crimp with your fingers or a fork to seal completely. This prevents the filling from leaking during baking.
Cut 4-5 slits in the top crust to allow steam to escape. I like to make a simple design—maybe a cross in the center or a few decorative cuts. Brush the entire surface with the 1 whole large egg beaten with 1 tablespoon water for a golden finish.
Step 4: Bake to Golden Perfection
Bake on the center rack for 40-45 minutes until the crust is deep golden brown and the filling is bubbling visibly through the slits. If the edges begin to brown too quickly, cover them loosely with foil or a pie shield.
You’ll know it’s done when the crust looks crisp and flaky, and the filling has set with no jiggle in the center. The aroma should be irresistible—creamy with just a hint of tarragon and lemon.
Let the pie rest for 15 minutes before slicing. This gives the filling time to thicken slightly and makes serving much easier—and cleaner.
Pro Tips For Making Chicken Salad Pie
- Chill the Crust: Pop your pie crust in the freezer for 10-15 minutes before baking—it keeps the edges from slumping when you add the wet chicken salad filling.
- Shred Chicken Fine: I learned this the hard way: chop the cooked chicken breast into small, even pieces so every bite has a good mix of chicken, celery, and onion without big chunks.
- Drain the Veggies: After dicing celery and onion, pat them dry with a paper towel to remove excess moisture, otherwise your filling gets watery and the crust soggy.
- Blind Bake First: Par-bake the crust for 8-10 minutes before adding the filling—it creates a barrier that prevents the mayonnaise from making the bottom gummy.
Health Benefits of This Recipe
Protein Powerhouse
This dish packs a serious protein punch with 2 cups of cooked chicken breast, delivering about 40 grams of protein per serving. That’s ideal for muscle repair and keeping you full for hours. I love how it fuels my busy days at the restaurant. 💪
Vitamin-Rich Veggies
The 1 cup celery and ½ cup yellow onion bring fiber, vitamin K, and folate to the table. Celery also adds a satisfying crunch while contributing hydration. It’s a great way to sneak in extra nutrients without sacrificing flavor.
Healthy Fats Balance
The ¾ cup mayonnaise and ¼ cup sour cream provide rich, creamy texture with healthy fats that support brain function. Using full-fat versions ensures the filling stays luscious and satisfying. I never skimp here—flavor is key.
Boosted Immunity
Lemon juice and tarragon add more than just zing—they’re packed with vitamin C and antioxidants. The ½ cup frozen peas also contribute vitamin A and iron, making this pie a well-rounded meal. 🥗
Low-Carb Option
Skip the top crust for a lighter version that cuts carbs significantly. You’ll still get all the creamy filling and flaky bottom crust. I’ve served this to carb-conscious friends, and they never feel like they’re missing out.
Comfort Food Wellness
This creation proves comfort food can be nutritious. The balance of protein, veggies, and healthy fats keeps energy levels steady. It’s my go-to when I want something hearty that doesn’t weigh me down. ⚡
Nutrition Facts
Frequently Asked Questions
Can I use rotisserie chicken instead of cooking my own?
Rotisserie chicken works perfectly and saves time. Just shred or dice 2 cups of the cooked meat, ensuring you remove any skin or bones first.
How do I prevent the bottom crust from getting soggy?
Pre-bake the bottom crust for 8-10 minutes at 375°F before adding the filling. Also, ensure your filling isn’t too wet—add 1 tablespoon flour if needed.
Can I make this pie ahead of time?
Yes! Assemble the pie and refrigerate for up to 24 hours before baking. You can also freeze the unbaked pie for up to 1 month—just thaw overnight before baking.
What can I substitute for tarragon?
If you don’t have tarragon, use ½ teaspoon dried dill or 1 teaspoon fresh dill for a similar herbal note. A pinch of thyme also works in a pinch.

- Jollof Rice Sauce Recipe: West African Tomato and Spice Infusion - September 25, 2026
- Japanese Rice Soup Recipe: Umami-Rich Comfort in a Bowl - September 25, 2026
- Homemade Cream Of Rice Recipe: Silk-Smooth Breakfast in Minutes - September 25, 2026