
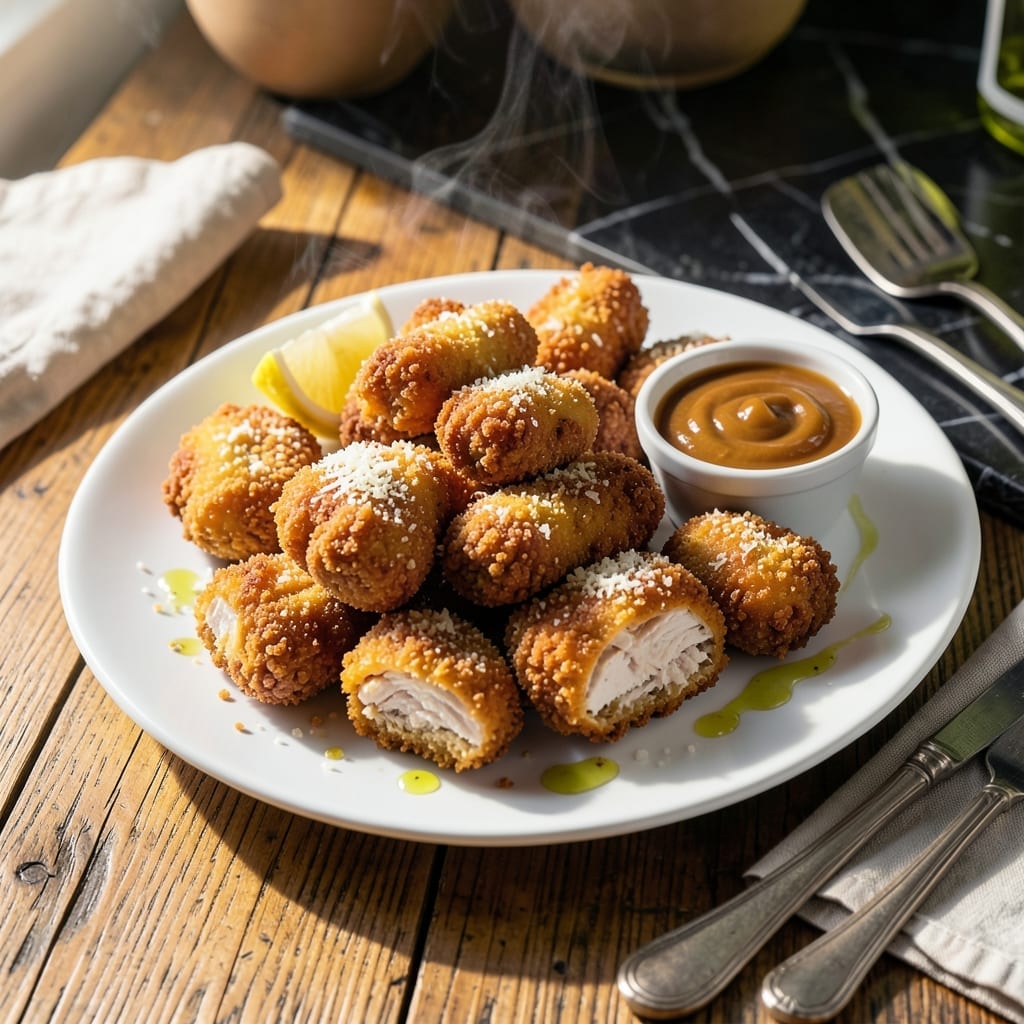
I developed this gluten-free chicken nugget recipe after years of testing to achieve that perfect crispy texture without wheat. The secret is a double-coating method using rice flour and cornstarch for maximum crunch.
Each bite delivers tender chicken inside with a shatteringly crispy exterior that holds up even when baked. The coating absorbs minimal oil while browning beautifully, creating that golden finish everyone loves.
These nuggets require just 25 minutes from start to finish, with most of that time spent in the oven. They’re ideal for quick weeknight meals or lunchbox additions that kids actually get excited about.
Serve with your favorite dipping sauces for a meal that satisfies every craving. The texture and flavor will convert even gluten-free skeptics.
Ingredients for Gf Chicken Nuggets
Pantry staples plus chicken—nothing exotic, just the right stuff for perfect crispy bites.
| Ingredient | Amount | Notes |
|---|---|---|
| Boneless Skinless Chicken Breasts 🍗 | 1 ½ lb | Cut into 1-inch pieces |
| Rice Flour 🌾 | 1 cup | For first coating layer |
| Cornstarch 🌽 | ½ cup | For crispy texture |
| Large Eggs 🥚 | 2 whole | For egg wash binding |
| Gluten-Free Breadcrumbs 🍞 | 1 ½ cups | Plain or panko style |
| Grated Parmesan Cheese 🧀 | ½ cup | For flavor in coating |
| Garlic Powder 🧄 | 1 tsp | For savory depth |
| Onion Powder 🧅 | 1 tsp | For aromatic base |
| Paprika 🌶️ | 1 tsp | For color and warmth |
| Salt 🧂 | 1 tsp | Kosher or sea salt |
| Black Pepper 🌶️ | ½ tsp | Freshly ground preferred |
| Olive Oil 🫒 | 3 tbsp | For baking and crisping |
The chicken needs to be fresh—look for plump, pale pieces without that grayish tint. I grab mine from Whole Foods or Costco (their organic breasts are consistently good). The rice flour is key here—Bob’s Red Mill is my go-to brand, but any will work. For the breadcrumbs, Ian’s or Aleia’s gluten-free panko gives that extra crunch. Check the label for wheat if you’re buying store brand.
No rice flour? Tapioca starch or potato starch works in a pinch (same amount). Out of gluten-free breadcrumbs? Crushed gluten-free cornflakes are a great hack. Eggs are non-negotiable for binding, but if you’re out, buttermilk at 1/4 cup does the trick. The Parmesan can be swapped for Pecorino Romano—sharper flavor, but still delicious. Skip the salt if your breadcrumbs are already seasoned.
Prep the chicken right before coating—it dries out fast. The nuggets keep in the fridge for 2 days raw (covered), or freeze uncooked for up to 3 months. Baked extras? They reheat great in the oven at 375°F for 10 minutes.
Why You’ll Love This Recipe
- One Pan Magic: I just toss the chicken in rice flour and cornstarch, dip in egg, roll in gluten-free breadcrumbs—no fancy steps, no mess.
- Crispy Perfection: That first bite with the crunchy outside and tender chicken inside? I could eat a whole batch by myself.
- Kid-Approved Staple: Between us, my picky nephew devours these nuggets and asks for more. Great for lunchboxes or quick dinners.
- Budget Winner: Chicken breasts on sale plus pantry staples means I make these for half the cost of store-bought gluten-free nuggets.
Step-by-Step Instructions for Crispy GF Chicken Nuggets
Here’s how I get that perfect crunch without a hint of gluten.
Step 1: Prep the Chicken and Set Up Breading Stations
Cut the 1.5 lb boneless skinless chicken breasts into 1-inch pieces. I like to keep them uniform so they cook evenly. Pat them dry with paper towels—this helps the coating stick better.
Set up three shallow bowls. In the first, mix the 1 cup rice flour with the 1 tsp salt, 1 tsp garlic powder, 1 tsp onion powder, and 1 tsp paprika. In the second, beat the 2 whole large eggs. In the third, combine the 1.5 cups gluten-free breadcrumbs, 0.5 cup cornstarch, 0.5 cup grated parmesan cheese, and 0.5 tsp black pepper.
Step 2: Coat Each Piece for Maximum Crispiness
Working one piece at a time, dredge the chicken in the rice flour mixture. Shake off any excess—you want a thin, even layer. Then dip into the beaten eggs, letting any excess drip off.
Finally, roll the piece in the breadcrumb mixture, pressing gently to help it adhere. Place the coated nuggets on a plate or baking sheet. I’ve found that pressing the breading on firmly prevents it from falling off during cooking.
Step 3: Pan-Fry to Golden Perfection
Heat the 3 tbsp olive oil in a large skillet over medium-high heat. Once the oil shimmers (a drop of water should sizzle), add the nuggets in a single layer, being careful not to overcrowd the pan. Cook for 3-4 minutes per side until they’re golden brown and crispy.
Use tongs to flip them—this keeps the coating intact. You’ll hear a satisfying sizzle when they’re ready to turn. If any spots look pale, give them another minute to crisp up.
Step 4: Drain and Serve Immediately
Transfer the cooked nuggets to a paper towel-lined plate to drain any excess oil. Let them rest for 1-2 minutes—just long enough to cool slightly but still stay warm.
Serve right away while they’re at peak crispiness. These are best fresh out of the pan, but if you need to keep them warm, place them on a wire rack in a 200°F oven for up to 10 minutes. Any longer and they’ll lose that perfect crunch you worked so hard to achieve.
Pro Tips For Making Gf Chicken Nuggets
- Double Dredge: Dip the chicken in rice flour first, then egg, then breadcrumbs, and repeat the egg and breadcrumb step—I learned this the hard way after my first batch kept losing its crust in the pan.
- Press the Crumbs: After coating, press the gluten-free breadcrumbs firmly into the chicken with your fingers so they stick better during frying or baking.
- Rest Before Cooking: Let the breaded nuggets sit for 10 minutes on a wire rack before cooking—this keeps the coating from sliding off when it hits the oil.
- Use Cold Chicken: Cut the chicken straight from the fridge; it’s firmer and holds together better when you’re shaping the nuggets, especially with gluten-free coatings.
Pro Cooking Tips for This Dish
Double-Coating Secret
For extra crunch, I always do a second pass through the egg wash and breadcrumb mixture after the first coating sets for 5 minutes. This builds layers that crisp up beautifully. Press firmly to ensure each nugget gets fully covered. 💪
Oil Temperature Control
Maintain 350-375°F oil temperature in your skillet. Too low and you’ll get greasy nuggets; too high and they’ll burn before cooking through. I use a candy thermometer clipped to the side for precision.
Uniform Size Matters
Cut your chicken into consistent 1-inch pieces so they cook evenly. Larger pieces won’t crisp properly, while smaller ones may overcook. I weigh my portions to ensure 1.5 oz each for perfect results.
Rest Between Batches
When frying multiple batches, let the oil recover to full temperature between additions. Overcrowding drops the temperature, leading to soggy coatings. I typically fry in 3-4 batches for the best texture. 🔥
Oven Finish Option
For a lighter version, bake at 400°F on a wire rack for 12-15 minutes, flipping halfway. Spray with olive oil before baking for extra crispiness. This method uses less oil but still delivers great crunch.
Salt Timing
Season your nuggets immediately after frying while they’re still hot. The salt sticks better to the warm surface. I use flaky sea salt for a final touch that enhances all the flavors.
Nutrition Facts
Frequently Asked Questions
Can I bake instead of pan-frying?
Bake at 400°F on a wire rack for 12-15 minutes, flipping halfway. Spray with olive oil first for extra crispiness. This method uses less oil with great results.
What if my coating keeps falling off?
Pat chicken pieces completely dry before coating and press breading on firmly. A 5-minute rest between coatings helps them adhere better. Overcrowding the pan can also cause this issue.
Can I use almond flour instead of rice flour?
Yes, but it will create a denser coating. Stick to the same 1 cup measurement. For best texture, mix it with cornstarch as the recipe directs.

- Jollof Rice Sauce Recipe: West African Tomato and Spice Infusion - September 25, 2026
- Japanese Rice Soup Recipe: Umami-Rich Comfort in a Bowl - September 25, 2026
- Homemade Cream Of Rice Recipe: Silk-Smooth Breakfast in Minutes - September 25, 2026