
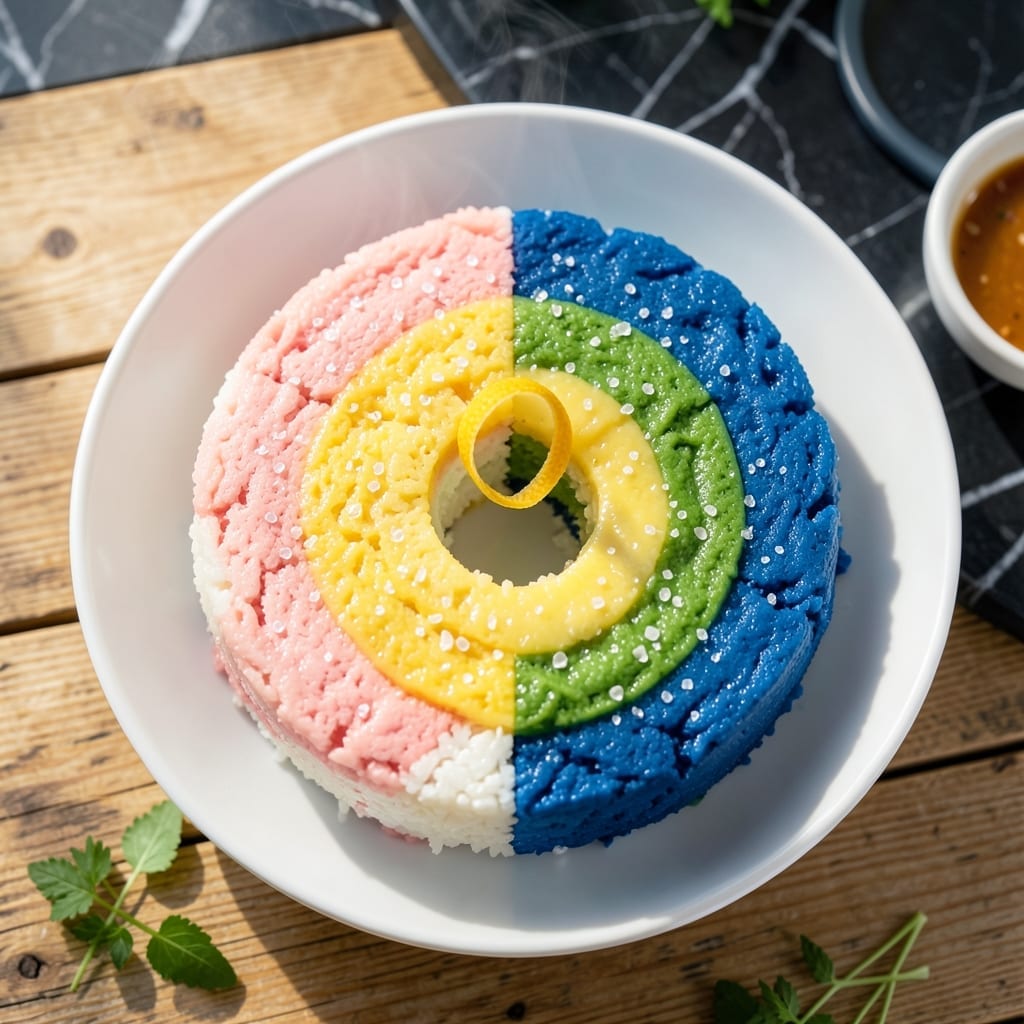
This layered rice cake transforms a simple ingredient into a visually stunning dessert that tastes as good as it looks. Each colorful layer maintains its distinct hue while delivering that signature chewy texture.
The secret lies in dividing the batter and tinting each portion with natural food colorings before steaming. This method preserves the vibrant colors without altering the delicate rice flavor.
What emerges is a towering cake with perfectly defined layers that impress at any gathering. The steam cooking process ensures each bite remains soft and slightly sticky, just as it should be.
Serve this at celebrations or as a special treat when you want to make an ordinary day extraordinary. The technique is straightforward, but the results look professional.
Ingredients for Rainbow Rice Cake
Simple ingredients create this visually stunning, naturally colorful dessert with signature chewy texture.
| Ingredient | Amount | Notes |
|---|---|---|
| Glutinous Rice Flour 🌾 | 2 cups | Also called sweet rice flour |
| Granulated Sugar 🍚 | ¾ cup | Adjust to taste preference |
| Water 💧 | 1 ½ cups | Room temperature for batter |
| Coconut Milk 🥥 | ½ cup | Full-fat for richness |
| Natural Red Food Coloring 🍓 | ½ tsp | Beet juice or powder |
| Natural Yellow Food Coloring 🍋 | ½ tsp | Turmeric or saffron |
| Natural Green Food Coloring 🍃 | ½ tsp | Matcha or spinach powder |
| Natural Blue Food Coloring 💙 | ½ tsp | Blue spirulina or butterfly pea |
| Natural Purple Food Coloring 💜 | ½ tsp | Purple sweet potato or red cabbage |
| Vanilla Extract 🌿 | 1 tsp | Pure extract preferred |
| Salt 🧂 | ¼ tsp | Balances sweetness |
| Neutral Oil 🫒 | 1 tbsp | For greasing the mold |
Glutinous rice flour is non-negotiable here—look for it in the Asian aisle or Amazon if your store doesn’t carry it. Sweet rice flour is the same thing, just labeled differently. The natural colorings are what make this special: beet juice for red, turmeric for yellow—these won’t alter the flavor like artificial dyes can. Full-fat coconut milk adds richness without dairy.
Out of a specific color? Skip it—fewer layers still look impressive. No natural dyes? A few drops of food-grade liquid work (use sparingly). The coconut milk can be swapped for oat milk or almond milk, but the texture might be slightly less rich. For sugar, coconut sugar works one-to-one if you prefer less refinement.
Store rice flour in the freezer to prevent bugs—6-12 months shelf life. The cake keeps 3-4 days at room temperature, wrapped. Best made fresh, but leftovers can be steamed again to revive the texture. Natural colorings may fade over time, so eat within 2 days for vibrant layers.
Why You’ll Love This Recipe
- Mix and Steam: No fancy techniques—just stir the glutinous rice flour, coconut milk, and sugar, then steam in layers.
- Coconut Sweetness: The coconut milk gives it this rich, creamy taste that pairs perfectly with the subtle sweetness.
- Party-Ready Treat: I bring these to potlucks and they’re always the first to disappear—kids love the colors.
- Budget Stretcher: A bag of rice flour and a can of coconut milk make a big batch for pennies. Honestly, it’s my wallet’s favorite dessert.
Step-by-Step Instructions for Vibrant Rainbow Rice Cake Layers
This method ensures even layers with consistent color and perfect chewy texture every time.
Step 1: Prepare the Base Batter
In a large mixing bowl, whisk together the 2 cups Glutinous Rice Flour, 0.75 cup Granulated Sugar, and 0.25 tsp Salt until fully combined. These dry ingredients form the foundation of your cake’s structure and sweetness.
Gradually pour in the 1.5 cups Water and 0.5 cup Coconut Milk while whisking continuously to prevent lumps. Then stir in the 1 tsp Vanilla Extract. The batter should be smooth with the consistency of heavy cream. Let it rest for 10 minutes to allow the flour to hydrate completely.
Step 2: Divide and Color the Batter
Evenly divide the base batter into 5 equal portions (about ⅔ cup each). This ensures you have enough for each color layer. I use a kitchen scale for precision, but equal volume divisions work well too.
To each portion, add one type of natural food coloring: 0.5 tsp Natural Red Food Coloring, 0.5 tsp Natural Yellow Food Coloring, 0.5 tsp Natural Green Food Coloring, 0.5 tsp Natural Blue Food Coloring, and 0.5 tsp Natural Purple Food Coloring. Stir each until the color is uniform and vibrant throughout.
Step 3: Steam the First Layer
Lightly grease an 8-inch round cake pan with the 1 tbsp Neutral Oil. This prevents sticking and helps the cake release cleanly after steaming. Pour in your first colored batter (I typically start with purple for the base) and spread it evenly.
Place the pan in a steamer with 2 inches of boiling water. Cover and steam on medium-high heat for 8-10 minutes until the layer is set and a toothpick inserted in the center comes out clean. The surface should look matte, not wet or shiny.
Step 4: Build Remaining Layers
Gently pour the next colored batter over the first layer, being careful not to disturb the set layer beneath. Spread evenly and return to the steamer. Repeat this process with each remaining color, steaming each new layer for 8-10 minutes until set.
As you add each layer, you’ll see the colors remain distinct if you pour gently and don’t overmix. The total steaming time will be about 40-50 minutes for all layers. The cake is done when a toothpick inserted through all layers comes out clean.
Step 5: Cool and Serve
Remove the pan from the steamer and let the cake cool in the pan for 15 minutes. This helps it set completely and makes it easier to remove. Then, run a thin knife around the edges and invert onto a wire rack to cool completely.
Slice when fully cooled for clean, even layers. The colors should be vivid and distinct, with a slightly sticky, chewy texture throughout. Serve at room temperature for the best texture and flavor.
Pro Tips For Making Rainbow Rice Cake
- Steam Evenly: Use a bamboo steamer with a tight lid and make sure the water is at a rolling boil before adding the cake—otherwise, the colors won’t set properly and the texture turns gummy.
- Sift the Flour: I learned this the hard way—lumps in glutinous rice flour lead to dense spots in the cake, so sift it twice before mixing with the wet ingredients.
- Skip Cold Coconut Milk: After burning three batches, I finally figured out that room-temperature coconut milk blends smoothly into the batter, while cold milk can cause the colors to streak.
- Layer Fast: Have all your colored batters ready to go before you start layering—if you wait too long between pours, the colors bleed into each other.
Make-Ahead Tips for rainbow rice cake
Prep Ahead Strategy
Divide and color the batter up to 24 hours in advance. Store each portion in separate airtight containers at 40°F. Stir before steaming as colors may settle. I’ve found the vibrant hues actually intensify overnight in the fridge. 💡
Layer Steaming Schedule
Steam the first 2-3 layers the day before, then refrigerate the partially cooked cake in its pan. The next day, bring to room temperature and continue steaming remaining layers. This breaks the process into manageable chunks.
Color Preservation
Natural colorings fade with prolonged steam exposure. To maintain vibrancy, steam each layer exactly 8 minutes—no longer. Use beet juice for red and matcha for green as they hold color best. Avoid direct sunlight when cooling.
Storage Solutions
Once completely cooled, wrap the cake tightly in plastic wrap then foil. It keeps at room temperature for 2 days or refrigerated for 4 days. Slice just before serving to preserve the layered look. ❄️
Reviving Leftovers
If the cake dries out, steam whole for 5-7 minutes until soft. For individual slices, microwave covered with a damp paper towel for 15-20 seconds. The texture returns to its original chewiness.
Freezing Option
Freeze unsliced cake for up to 1 month. Thaw overnight in the fridge, then steam for 10 minutes to refresh. Avoid freezing sliced portions as they lose moisture faster.
Nutrition Facts
Frequently Asked Questions
Can I use regular rice flour instead of glutinous?
No, the texture will be completely different. Glutinous rice flour is essential for that signature chewy texture. Regular rice flour creates a dry, crumbly result.
How do I get perfectly even layers?
Divide batter by weight, not volume, for precision. Steam each layer exactly 8-10 minutes before adding the next. Pour gently to avoid mixing colors.
Why are my colors fading during steaming?
Natural dyes are heat-sensitive. Use beet juice or matcha for most stable colors. Steam layers no longer than 8 minutes each to preserve vibrancy.
Can I make this without a steamer?
Yes! Use a large pot with a heatproof rack and 2 inches of water. Cover tightly with foil to trap steam. Check water level every 15 minutes.

- Jollof Rice Sauce Recipe: West African Tomato and Spice Infusion - September 25, 2026
- Japanese Rice Soup Recipe: Umami-Rich Comfort in a Bowl - September 25, 2026
- Homemade Cream Of Rice Recipe: Silk-Smooth Breakfast in Minutes - September 25, 2026