
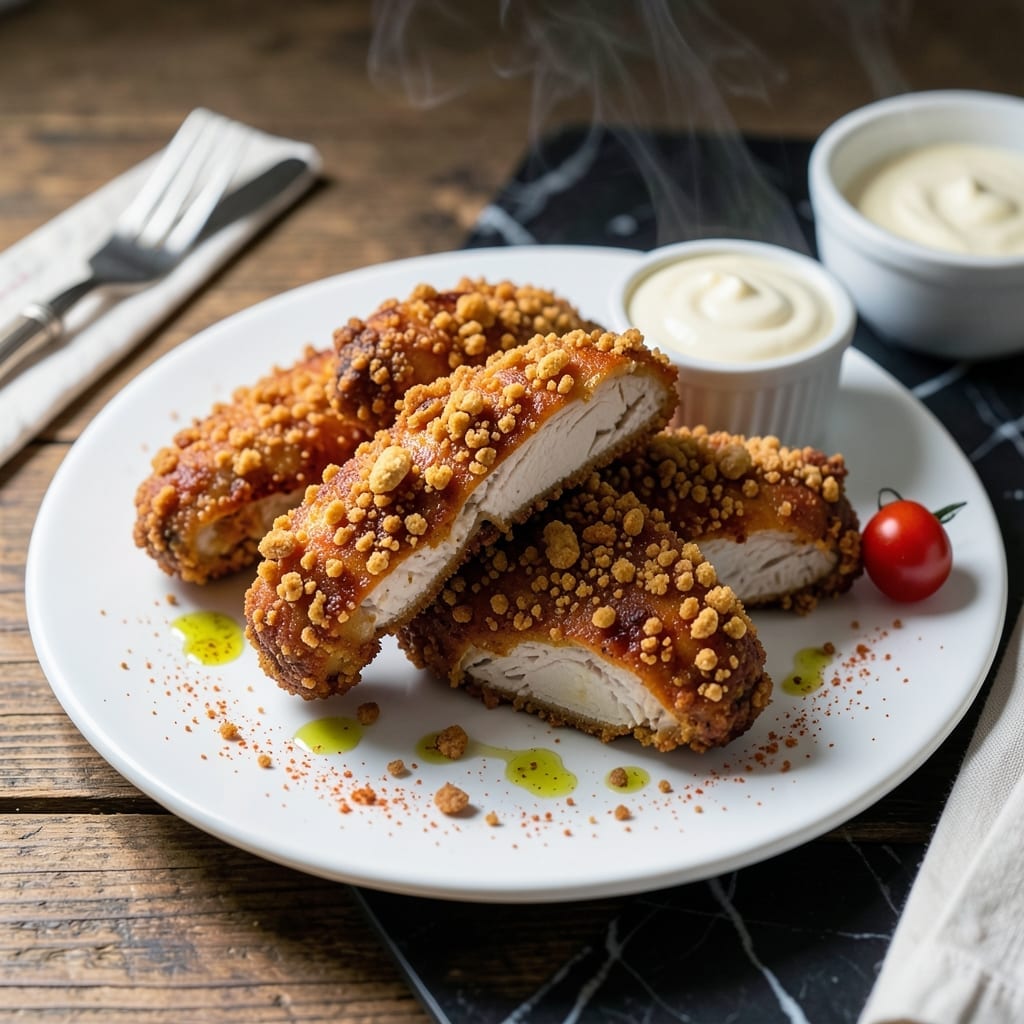
There’s something undeniably satisfying about crispy chicken with a nostalgic twist. This cereal-coated version delivers a crunch that’s hard to beat.
The secret lies in crushing Captain Crunch cereal into fine crumbs, which creates a golden, crispy coating that clings perfectly to the chicken. A quick dip in egg and buttermilk ensures every bite stays juicy inside.
Baked at 400°F, the chicken emerges with a shatteringly crispy exterior and tender meat beneath. The cereal’s sweetness balances the savory, making it a hit with kids and adults alike.
Serve with honey mustard or ranch for dipping. This dish turns a simple ingredient into something extraordinary.
Ingredients for Captain Crunch Chicken
Crispy cereal-coated chicken requires just these pantry staples and a nostalgic breakfast favorite.
| Ingredient | Amount | Notes |
|---|---|---|
| Chicken Breast 🍗 | 1 ½ lb | Boneless, skinless, cut into strips |
| Captain Crunch Cereal 🥣 | 4 cups | Crushed into fine crumbs |
| All-Purpose Flour 🌾 | ½ cup | For dredging chicken strips |
| Large Eggs 🥚 | 2 whole | Beaten for egg wash |
| Buttermilk 🥛 | ½ cup | For moist, tender coating |
| Olive Oil 🫒 | 2 tbsp | For baking sheet preparation |
| Salt 🧂 | 1 tsp | Kosher or sea salt preferred |
| Black Pepper 🌶️ | ½ tsp | Freshly ground for best flavor |
| Paprika 🌶️ | 1 tsp | Sweet or smoked variety |
| Garlic Powder 🧄 | ½ tsp | For savory depth |
| Honey Mustard 🍯 | ½ cup | For dipping, optional |
| Ranch Dressing 🥣 | ½ cup | For dipping, optional |
The cereal is non-negotiable here—Captain Crunch delivers the signature crunch and sweetness that defines this dish. Look for the classic version, not the berry-flavored variety. Whole Foods or Target typically stock it year-round. For the chicken, boneless, skinless breasts cut into even strips ensure uniform cooking and maximum crispiness.
No buttermilk? Milk plus a tablespoon of vinegar or lemon juice works in a pinch. Swap the flour for cornstarch if you prefer an extra-crispy coating. The dipping sauces are flexible—honey mustard or ranch are classic, but BBQ sauce or spicy mayo work too. If you’re feeding a crowd, double the cereal crumbs (they disappear fast).
Baked chicken strips keep in the fridge for 3-4 days—reheat in the oven to maintain crispiness. The cereal crumbs can be prepped a day ahead and stored in an airtight container. This dish doesn’t freeze well, but leftovers make great sandwiches the next day.
Why You’ll Love This Recipe
- No-Fuss Coating: I just pulse the Captain Crunch in my food processor, dip the chicken in buttermilk and egg, and roll—no fancy techniques.
- Sweet Crunch: The cereal gives it that nostalgic sweetness with a ridiculous crunch that even picky eaters can’t resist.
- Weeknight Win: Honestly, it’s my go-to for busy Tuesdays when I need dinner on the table faster than takeout would arrive.
- Budget Stretcher: One box of cereal coats enough chicken for four, and leftovers taste just as good cold the next day.
Step-by-Step Instructions for Crispy Cereal-Coated Chicken Bites
Here’s the method. Straightforward, tested, works every time.
Step 1: Prepare the Chicken and Coating Stations
Begin by cutting the 1.5 lb Chicken Breast into 1-inch thick strips. I prefer uniform sizes so they cook evenly. Season the strips lightly with 1 tsp Salt, 0.5 tsp Black Pepper, 1 tsp Paprika, and 0.5 tsp Garlic Powder—this builds flavor from the inside out.
Set up three shallow bowls: one with 0.5 cup All-Purpose Flour, one with 2 whole Large Eggs beaten with 0.5 cup Buttermilk, and one with 4 cups Captain Crunch Cereal crushed into fine crumbs. The cereal’s sugar will caramelize, creating that signature crispy, golden crust.
Step 2: Dredge and Coat the Chicken
Working with one piece at a time, dredge each chicken strip in the flour, shaking off any excess. This creates a base layer for the egg wash to adhere to. Next, dip the floured strip into the egg-buttermilk mixture, letting any excess drip off for 5 seconds.
Transfer the strip to the crushed cereal, pressing gently to ensure full coverage. The buttermilk in the egg wash adds tenderness while helping the coating cling. Place each coated strip on a plate and let them rest for 5 minutes to set the crust before baking.
Step 3: Bake to Golden Perfection
Preheat your oven to 400°F. Line a baking sheet with parchment paper and drizzle with 2 tbsp Olive Oil, spreading it evenly to prevent sticking. Arrange the coated chicken strips on the sheet, leaving 1 inch between each piece to ensure even browning.
Bake for 15-18 minutes, flipping halfway through, until the coating is deep golden brown and the chicken reaches an internal temperature of 165°F. The cereal will crisp up beautifully, creating a crunchy exterior that contrasts perfectly with the juicy interior.
Step 4: Rest and Serve with Dipping Sauces
Remove the chicken from the oven and let it rest on the baking sheet for 5 minutes. This allows the juices to redistribute, keeping the meat moist. The coating will firm up slightly as it cools, making it easier to handle.
Serve immediately with 0.5 cup Honey Mustard and 0.5 cup Ranch Dressing for dipping. The sweetness of the honey mustard complements the savory, crispy coating, while the ranch adds a creamy contrast. These bites are best enjoyed fresh from the oven when the crust is at its crispiest.
Pro Tips For Making Captain Crunch Chicken
- Crush the Cereal Fine: Pulse the Captain Crunch in a food processor until it’s a coarse powder—big chunks won’t stick and you’ll end up with bald spots on your chicken. I learned this the hard way after picking cereal bits out of my teeth instead of enjoying a crispy bite.
- Buttermilk Soak Overnight: Give the chicken a full 12-hour soak in buttermilk if you can swing it. Sounds like overkill, but it actually changes the outcome—juicier meat and the coating clings like it’s glued on.
- Skip the Cold Oil: Make sure your oil is hot before the chicken goes in—about 350°F. After burning three batches, I finally figured out that cold oil means soggy, greasy breading instead of that golden crunch.
- Double Dredge for Crunch: Dip the chicken in flour, then egg, then cereal, and repeat. I was skeptical until I tried it, but the extra layer guarantees that satisfying snap with every bite.
Common Mistakes When Making captain crunch chicken
Over-Crushing Cereal
One common mistake is pulverizing the cereal into a fine powder. You want coarse crumbs, not dust, for that signature crunch. I pulse 4 cups Captain Crunch in my food processor for 3-4 seconds to achieve the perfect texture. Too fine, and the coating turns soggy. 💡
Skipping the Rest
After coating, let the strips rest for 5 minutes before baking. This step helps the coating adhere better and prevents it from sliding off during cooking. I’ve learned this the hard way—skipping it leads to bare spots and uneven crispiness.
Crowding the Pan
Arrange the strips with at least 1 inch between each piece on the baking sheet. Overcrowding causes steam to build up, making the coating soft instead of crispy. Use two pans if needed—crispy results are worth the extra effort.
Under-Baking Time
Bake at 400°F for the full 15-18 minutes, flipping halfway. The cereal needs this time to crisp and caramelize. I check for a deep golden brown color and an internal temp of 165°F to ensure doneness.
Wrong Dipping Sauce
Avoid overpowering sauces that mask the cereal’s sweetness. Stick with honey mustard or ranch dressing—their mild flavors complement the dish. Heavy or spicy sauces can clash with the nostalgic taste you worked hard to create.
Using Cold Chicken
Take the chicken out of the fridge 15-20 minutes before prepping. Cold meat causes the coating to steam rather than crisp. Room-temperature strips ensure even cooking and that satisfying crunch in every bite. ⚡
Nutrition Facts
Frequently Asked Questions
Can I use a different cereal?
Stick with Captain Crunch for the best texture and flavor. Other cereals may not crisp as well or could overpower the dish.
How do I keep the coating crispy?
Bake at 400°F on a wire rack for air circulation. Avoid covering leftovers, as steam will soften the crust.
Can I air fry this instead?
Yes! Cook at 375°F for 10-12 minutes, flipping halfway. The air fryer gives extra crispiness with less oil.
What if my coating falls off?
Press firmly when coating, and let strips rest 5 minutes before baking. This helps the crumbs adhere better.

- Jollof Rice Sauce Recipe: West African Tomato and Spice Infusion - September 25, 2026
- Japanese Rice Soup Recipe: Umami-Rich Comfort in a Bowl - September 25, 2026
- Homemade Cream Of Rice Recipe: Silk-Smooth Breakfast in Minutes - September 25, 2026