
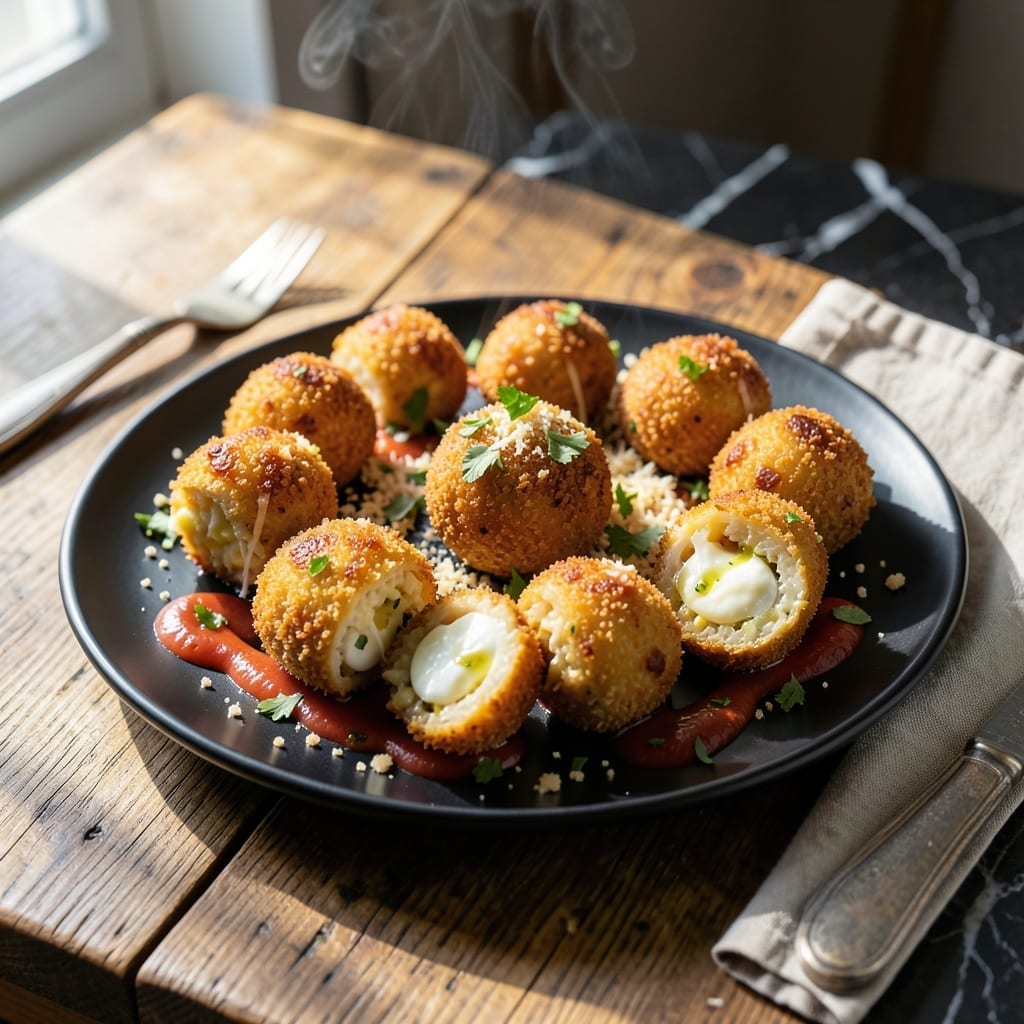
There’s something magical about biting into a perfectly fried rice ball, only to discover a crispy exterior giving way to a molten cheese center. I first experienced this in Nonna’s tiny kitchen, where she taught me the importance of patience and precision in every step.
This dish transforms simple ingredients—leftover risotto, breadcrumbs, and cheese—into an elegant appetizer or light meal. The key is using cold risotto, which holds its shape better during frying and ensures a uniform, golden finish.
The result is a delicate balance of textures: a shatteringly crispy shell that yields to creamy, cheesy rice inside. It’s a dish that feels special yet remains approachable for any home cook.
Serve warm for the best experience, when the cheese is at its most gooey and inviting. Here’s how to achieve it at home.
Ingredients for Italian Fried Rice Balls
Leftover risotto, cheese, and breadcrumbs transform into these golden, crispy delights with gooey centers.
| Ingredient | Amount | Notes |
|---|---|---|
| Leftover Risotto 🍚 | 4 cups | Cold, preferably overnight |
| Mozzarella Cheese 🧀 | 6 oz | Fresh, cut into small cubes |
| Parmesan Cheese 🧀 | ½ cup | Freshly grated preferred |
| Breadcrumbs 🍞 | 1 ½ cups | Italian-style, fine |
| Large Eggs 🥚 | 2 whole | Beaten for binding |
| All-Purpose Flour 🌾 | ½ cup | For dredging rice balls |
| Olive Oil 🫒 | 2 cups | For deep frying |
| Garlic Cloves 🧄 | 2 cloves | Minced, for risotto flavor |
| Fresh Parsley 🌿 | ¼ cup | Chopped, for garnish |
| Salt 🧂 | 1 tsp | Kosher or sea salt |
| Black Pepper 🌶️ | ½ tsp | Freshly ground preferred |
| Onion 🧅 | ½ whole | Finely diced, for risotto |
| Vegetable Broth 🍲 | 1 cup | Warm, for risotto prep |
The risotto needs to be stone cold—overnight in the fridge works best—otherwise it’ll fall apart when you try to shape it. I always use Carnaroli or Arborio for my base risotto since they’ve got that perfect creamy texture. For the cheese, fresh mozzarella from a block melts better than the pre-shredded stuff (which has anti-caking agents that mess with the goo factor).
No mozzarella? Provolone or fontina melt just as nicely into those cheesy pockets. Out of breadcrumbs? Panko crushed fine gives you extra crunch. The eggs can be swapped for a flax egg if you’re avoiding them, but the texture won’t be quite as cohesive. And if you’re making the risotto from scratch, use vegetable broth to keep it vegetarian-friendly.
These keep warm in a 200°F oven for about 30 minutes while you fry in batches. Leftovers? Reheat in the air fryer to bring back the crisp—3-4 minutes at 375°F. Best eaten fresh, but honestly, they’ll disappear fast either way.
Why You’ll Love This Recipe
- No-Fuss Prep: I just mix leftover risotto with cheese, roll, bread, and fry—no complicated steps.
- Cheesy Surprise: That gooey mozzarella center with crispy breadcrumbs? Pure comfort in every bite.
- Party or Snack: I serve these as appetizers for guests or pack them in lunchboxes for the kids.
- Zero Waste: Honestly, it’s my favorite way to use up that extra risotto sitting in the fridge.
Step-by-Step Instructions for Italian Fried Rice Balls
Here’s my method for achieving that perfect golden crust with gooey centers every time.
Step 1: Prepare the Risotto Base
If your leftover risotto isn’t cold, spread the 4 cups Leftover Risotto on a baking sheet and refrigerate for 30 minutes to firm up. Cold risotto is crucial—it holds its shape when rolled. While waiting, finely dice the 0.5 whole Onion and mince the 2 cloves Garlic Cloves.
In a small pan, warm the 1 cup Vegetable Broth and sauté the onion and garlic until soft. Mix this into the risotto with 0.5 cup Parmesan Cheese, 1 tsp Salt, and 0.5 tsp Black Pepper. Let it cool completely—this prevents the cheese from melting prematurely during frying.
Step 2: Form the Arancini with Cheese Centers
Cut the 6 oz Mozzarella Cheese into ½-inch cubes. Using your hands, take about ¼ cup of the risotto mixture and flatten it into a disc in your palm. Press a cube of mozzarella into the center, then gently enclose it completely with more risotto, rolling into a smooth 1.5-inch ball.
Here’s the thing—if the cheese peeks through, it’ll leak out during frying. Seal it tightly. Repeat until all risotto and cheese are used, placing finished balls on a parchment-lined tray. Chill for 20 minutes to set the shape.
Step 3: Bread the Rice Balls
Set up a breading station: one bowl with 0.5 cup All-Purpose Flour, another with 2 whole Large Eggs beaten with a fork, and a third with 1.5 cups Breadcrumbs. The flour creates a dry surface for the egg to cling to, while the breadcrumbs give that essential crispy texture.
Roll each ball in flour, shaking off excess, then dip in egg, letting any extra drip off. Finally, roll in breadcrumbs, pressing gently to adhere. For extra crunch, I double-dip: egg then breadcrumbs again. Place breaded balls back on the tray.
Step 4: Fry to Golden Perfection
Heat 2 cups Olive Oil in a deep, heavy pot to 350°F. Use a thermometer—this temperature ensures even cooking without burning the exterior before the inside warms through. Fry the balls in batches to avoid crowding, which lowers the oil temperature.
Cook for 3-4 minutes, turning occasionally, until deep golden brown all over. The breadcrumbs should sizzle steadily, not furiously. Remove with a slotted spoon and drain on a wire rack (not paper towels—this keeps them crispy).
Let cool for 2 minutes before serving. The cheese centers will be molten hot—this is the moment that matters: that first bite with the crisp shell giving way to the stretchy, gooey mozzarella inside.
Step 5: Garnish and Serve Immediately
Transfer to a serving platter and sprinkle with 0.25 cup Fresh Parsley. I like to serve these with warm marinara sauce for dipping, but they’re honestly perfect on their own. The contrast of the hot, crispy exterior with the cool, melted center is what makes these irresistible.
Real talk: these are best eaten fresh. If you must hold them, keep warm in a 200°F oven, but they lose some crispness. For leftovers, reheat in a 375°F oven for 10-12 minutes to revive the texture.
Pro Tips For Making Italian Fried Rice Balls
- Chill the Risotto: I learned this the hard way—warm risotto turns into a mushy disaster when shaping. Spread it on a tray and refrigerate for at least 2 hours so it firms up enough to hold its shape.
- Cube the Mozzarella: Skip the shredded stuff and cut mozzarella into ½-inch cubes. It melts slower, giving you that perfect gooey center without leaking out during frying.
- Double Coat for Crisp: After the egg wash, roll the balls in breadcrumbs, dip again in egg, then coat once more in crumbs. This extra layer guarantees a crunch that actually lasts.
- Fry at 350°F: After burning three batches, I finally figured out that 350°F is the sweet spot—hot enough for a golden crust but gentle enough to cook the center through before the outside burns.
Essential Equipment for italian fried rice balls
Deep Fryer Setup
I use a heavy Dutch oven for frying—my 5-quart Lodge holds 2-3 inches of oil perfectly. The thick walls distribute heat evenly, preventing hot spots that could burn your breading. Avoid nonstick pots; they can’t handle high heat safely. 🔥
Thermometer Essentials
Oil temperature is non-negotiable. I swear by my ThermoWorks Instant Read thermometer for accuracy. Maintain 350°F throughout frying—any lower and you’ll get greasy balls, any higher and they’ll brown too fast. Clip-on thermometers also work well for hands-free monitoring.
Breading Station
Set up three shallow bowls: one for flour, one for beaten eggs, and one for breadcrumbs. I use stainless steel mixing bowls from my Boston kitchen—they’re durable and easy to clean. A fork in the egg bowl helps drips fall back in rather than making a mess.
Draining Solution
A wire cooling rack placed over a baking sheet is my go-to for draining. Unlike paper towels, it allows air circulation on all sides, keeping your arancini crispy. I’ve tried brown paper bags too, but the rack method works better for batches.
Safety Gear
Hot oil requires caution. I always keep a splatter screen nearby and wear an apron. Tongs with a 12-inch length let you turn the balls without getting too close to the oil. Never leave the pot unattended—safety first in my tiny kitchen.
Reheating Helper
For leftovers, my air fryer brings back the crisp better than any oven. 375°F for 4 minutes works perfectly. If you don’t have one, a toaster oven with convection does the trick too. Just avoid microwaves—they’ll turn your beautiful balls soggy. 💡
Nutrition Facts
Frequently Asked Questions
Can I use fresh risotto instead of leftover?
No, fresh risotto is too warm and sticky. Spread it on a tray and chill for 1-2 hours first to firm up. Cold risotto holds shape during frying.
Why did my cheese leak out during frying?
This happens if the cheese isn’t completely sealed inside.
What oil is best for deep frying? Use oils with high smoke points like vegetable, canola, or peanut oil. Olive oil works but has a lower smoke point. Maintain 350°F throughout frying.
Can I bake these instead of frying?
Yes, but texture differs. Bake at 400°F for 20-25 minutes, turning halfway. They’ll be less crispy but still delicious.

- Mujadara Rice and Lentils Recipe: Earthy Spiced Lentils With Caramelized Onions - November 1, 2026
- Naija Fried Rice Recipe: Street-Style Spice With Veggie Crunch - November 1, 2026
- Mushy Rice Recipe: Fluffy Grains Transformed in Minutes - November 1, 2026