
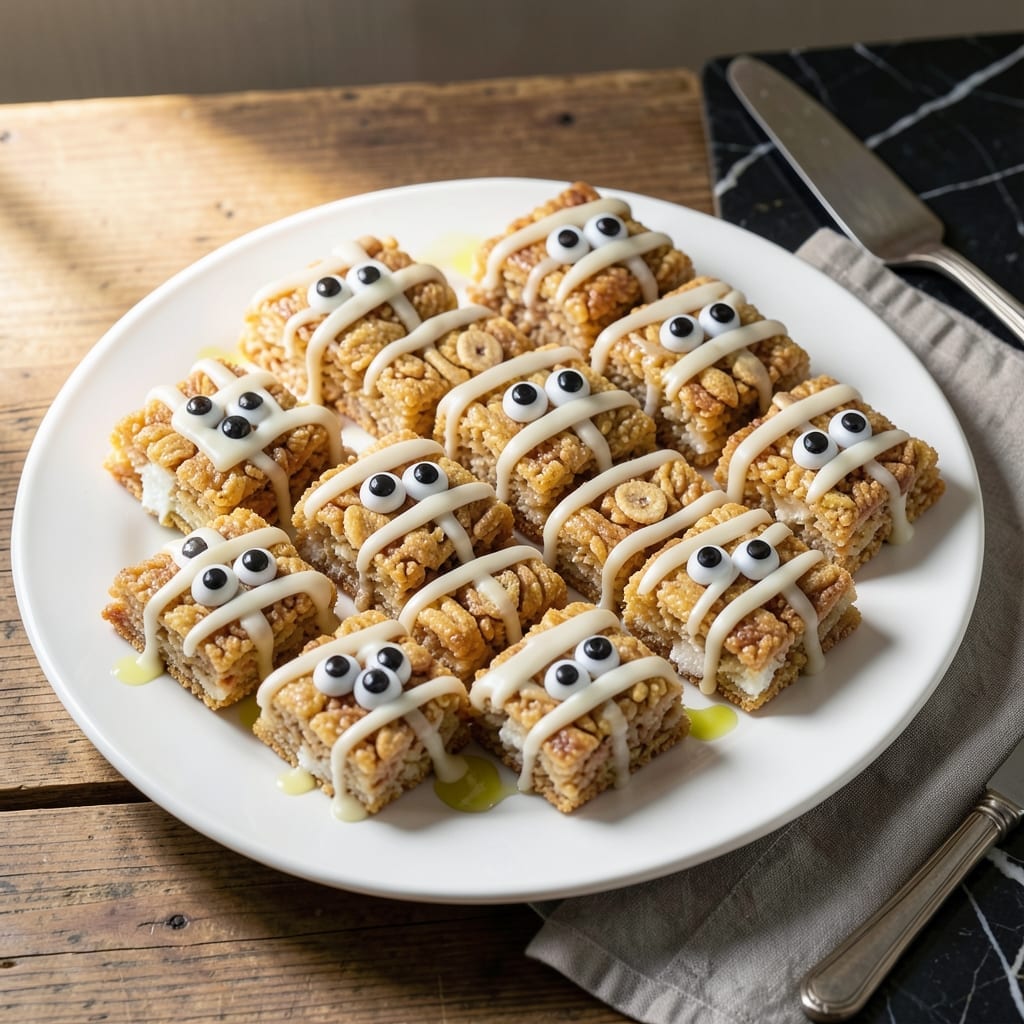
Halloween just got sweeter with this no-bake treat that’s as fun to make as it is to eat. Transform classic Rice Krispie treats into adorable mummy creations with just a few extra steps.
This recipe delivers perfectly chewy centers wrapped in white chocolate bandages, complete with candy eyes for a spooky finish. Simple, festive, and ready in 20 minutes.
Ingredients for Mummy Rice Krispie Treats
Transform classic ingredients into festive Halloween mummies with just a few creative additions.
| Ingredient | Amount | Notes |
|---|---|---|
| Rice Krispies Cereal 🥣 | 6 cups | Original variety preferred |
| Mini Marshmallows 🍬 | 10 oz | Fresh for best texture |
| Unsalted Butter 🧈 | 3 tbsp | For melting with marshmallows |
| White Chocolate Chips ⚪ | 12 oz | High-quality for smooth melting |
| Coconut Oil 🥥 | 1 tsp | For thinning chocolate if needed |
| Candy Eyeballs 👀 | 24 pieces | For mummy face decoration |
| Vanilla Extract 🌿 | ½ tsp | Pure extract preferred |
| Pinch of Salt 🧂 | 1 pinch | Enhances sweetness balance |
| Black Food Gel ⚫ | ¼ tsp | Optional for pupil detailing |
| Parchment Paper 📜 | 1 sheet | For lining baking dish |
The marshmallows are key here—Jet-Puffed or Kraft brands melt smoothly without turning grainy. For the Rice Krispies, stick with the original version; the generic brands can be hit or miss for texture. Ghirardelli or Guittard white chocolate chips melt beautifully for the bandages. Avoid white chocolate bars with added stabilizers as they can seize when reheated.
No white chocolate chips? White candy melts work in a pinch (melt with half the coconut oil). For a quicker method, use pre-made Rice Krispie treats and just add the white chocolate wrapping. The candy eyeballs are sold at Michaels or Party City seasonally. Skip the black gel if you’re short on time—the eyeballs look great without pupils.
Store treats in an airtight container at room temperature for up to 3 days. The white chocolate can soften in heat, so keep them cool. For longer storage, freeze for up to 1 month—thaw before serving to restore the chewy texture.
Why You’ll Love This Recipe
- One Pot Wonder: I melt the butter and marshmallows in a single saucepan, stir in the Rice Krispies, and we’re done. No fancy equipment, no stack of dishes.
- Melt-in-Your-Mouth Good: That combo of gooey mini marshmallows with the crisp cereal, all wrapped in white chocolate? Ridiculously good.
- Halloween Party Hero: Honestly, these disappear faster than any other treat I bring to class parties or Halloween get-togethers.
- Budget Friendly: A box of cereal and a bag of marshmallows make 24 treats. I’ll be real: it’s hard to find a crowd-pleaser this cheap.
Step-by-Step Instructions for Mummy Rice Krispie Treats
This method delivers perfectly bound treats with a spooky presentation every time.
Step 1: Prepare the Base Mixture
Line an 8×8-inch baking dish with the parchment paper, leaving an overhang on the sides for easy removal. In a large pot, melt the 3 tbsp unsalted butter over low heat until just melted, then add the 10 oz mini marshmallows and the pinch of salt.
Stir constantly with a silicone spatula until the marshmallows are completely smooth and no lumps remain, about 5-7 minutes. Remove from heat and immediately stir in the 0.5 tsp vanilla extract and the 6 cups Rice Krispies Cereal until evenly coated.
Step 2: Shape and Cool the Treats
Transfer the mixture to the prepared baking dish and press it down firmly using the spatula or buttered fingers. Ensure the top is level and smooth for even cutting later. Pressing too hard will make the treats dense, so use moderate pressure.
Let the mixture cool at room temperature for 20-25 minutes until firm enough to handle but still slightly warm. This consistency makes it easier to shape the mummy forms without crumbling. Avoid refrigerating at this stage—it will make the treats too brittle to work with.
Step 3: Create the Mummy Shapes
Once cooled, use a sharp knife to cut the slab into 4 equal rectangles. With clean hands, gently shape each rectangle into an oval, tapering the ends slightly to resemble a mummy’s wrapped form. The warmth from your hands will help the cereal stick together.
Place the shaped treats on a clean work surface. If the edges crack during shaping, press them back together gently—the cereal will bind as it cools further.
Step 4: Add the White Chocolate Bandages
In a microwave-safe bowl, melt the 12 oz white chocolate chips in 30-second intervals, stirring between each, until completely smooth. If the chocolate is too thick, stir in the 1 tsp coconut oil to thin it slightly for easier drizzling.
Drizzle the melted chocolate over each treat in a zigzag pattern to mimic mummy bandages, leaving a small gap for the candy eyeballs. Work quickly but deliberately—the chocolate will set within 5-10 minutes at room temperature.
Step 5: Attach the Eyeballs and Detail
Press 2 candy eyeballs into the uncovered section of each treat while the chocolate is still tacky. For added detail, use a toothpick to dot the 0.25 tsp black food gel onto the candy eyeballs to create pupils, if desired.
Let the treats set completely at room temperature for 30-45 minutes until the chocolate is firm. Serve immediately or store in an airtight container at room temperature for up to 3 days.
Pro Tips For Making Mummy Rice Krispie Treats
- Melt Butter Low: Keep the heat on medium-low when melting the butter and marshmallows—I learned this the hard way after scorching two batches. Too hot and the sugar in the marshmallows turns bitter.
- Use Fresh Cereal: Stale Rice Krispies won’t give you that satisfying snap, so double-check the box date. If it doesn’t crackle in milk, it won’t crackle in your treats.
- Skip the Overmixing: Stir just until the cereal is coated, then stop. Overworking the mixture turns it dense and gummy instead of light and crisp.
- Add Coconut Oil: Mix 1 teaspoon of coconut oil into the white chocolate chips before melting—it keeps the drizzle smooth and glossy, not clumpy. Sounds weird, but it works.
Health Benefits of This Dish
Energy Boost
These treats provide a quick energy lift from the marshmallow and cereal combination, perfect for Halloween party fuel. The Rice Krispies offer a light, crispy base, while marshmallows add a sweet, gooey energy source. 💪
Low-Fat Indulgence
With only 3 tbsp unsalted butter for the entire batch, this is a relatively low-fat dessert compared to many baked goods. The portion-controlled mummy shapes help manage serving sizes naturally.
Minimal Additives
You control the ingredients here—no preservatives or artificial colors beyond what you choose to add. Using pure vanilla extract and high-quality white chocolate ensures clean, simple ingredients.
Portion-Friendly
Each mummy treat contains about 250-300 calories, making them a reasonable portion for a sweet Halloween treat. The 6 cups Rice Krispies spread across four servings keeps carbs in check.
Allergen Awareness
This recipe contains dairy (butter, white chocolate) and may contain soy depending on your chocolate choice. For gluten-free versions, use gluten-free Rice Krispies and verify all other ingredients.
Fun Nutrition
While not a health food, these treats offer a fun way to engage kids in cooking. The shaping activity promotes fine motor skills, and the candy eyeballs add a playful touch to nutrition discussions. 🥳
Nutrition Facts
Frequently Asked Questions
Can I use regular marshmallows instead of mini?
Yes, but cut them into smaller pieces first. Mini marshmallows melt faster and more evenly. Using full-size may require 2-3 extra minutes of stirring to avoid lumps.
Why did my white chocolate seize up?
This usually happens if water or steam touches the chocolate. Use dry utensils and melt in 30-second bursts, stirring between each. Adding 1 tsp coconut oil can help smooth it out.
How do I make these gluten-free?
Swap in gluten-free Rice Krispies and ensure all other ingredients (like candy eyes) are certified gluten-free. The recipe works exactly the same way.
Can I make these ahead of time?
Store in an airtight container at room temperature for up to 3 days. For longer storage, freeze for up to 1 month and thaw before serving.

- Mujadara Rice and Lentils Recipe: Earthy Spiced Lentils With Caramelized Onions - November 1, 2026
- Naija Fried Rice Recipe: Street-Style Spice With Veggie Crunch - November 1, 2026
- Mushy Rice Recipe: Fluffy Grains Transformed in Minutes - November 1, 2026