
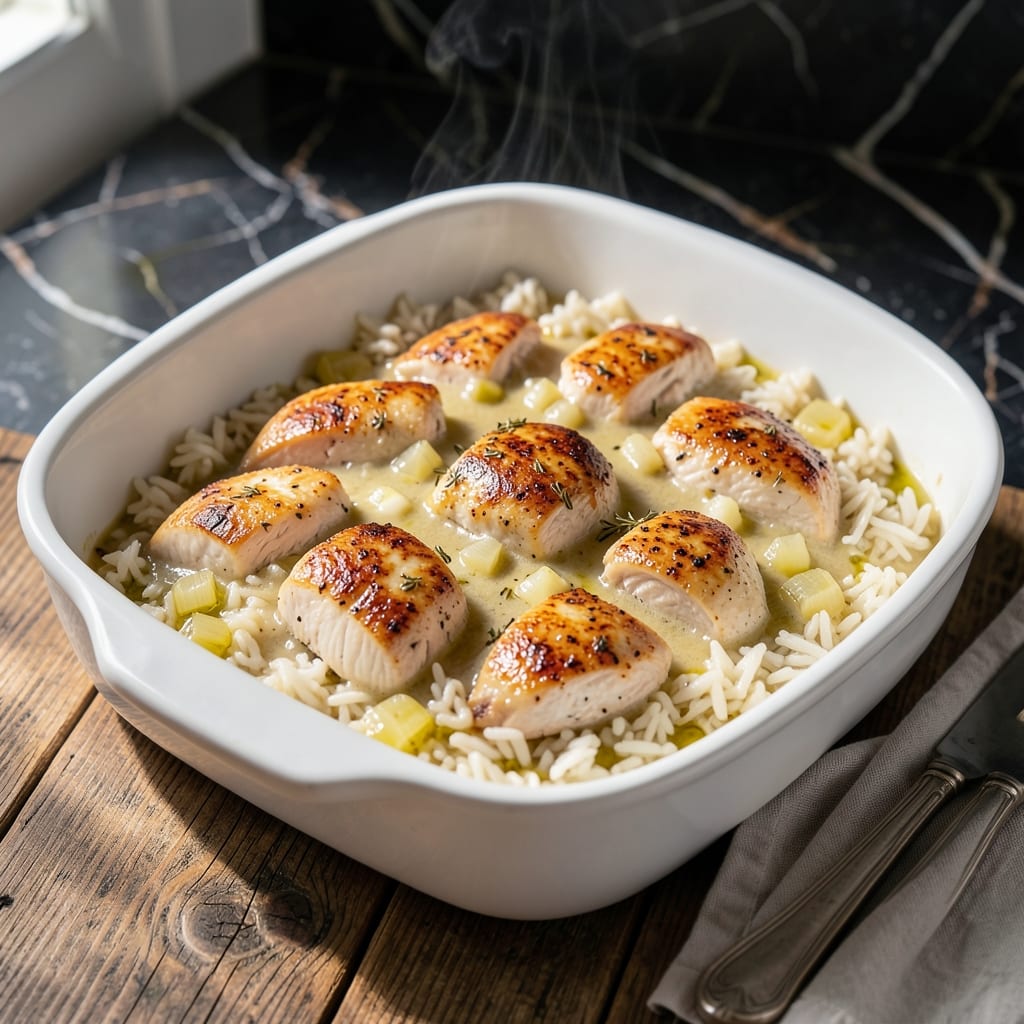
This baked chicken and rice delivers a creamy, comforting meal that the whole family will love. I developed this version to capture the classic flavors while keeping prep simple.
The dish comes together in one pan, with tender chicken and fluffy rice swimming in a rich, savory sauce. It’s the kind of recipe that feels special but requires minimal effort.
What makes it work is the balance of textures and flavors—juicy chicken, perfectly cooked rice, and a velvety sauce that ties everything together. You’ll end up with a satisfying, hearty dish.
Perfect for busy weeknights or lazy weekends when you want a meal that practically makes itself.
Ingredients for Campbell’s Baked Chicken and Rice
Pantry staples meet a few fresh items for this creamy, comforting one-pan wonder.
| Ingredient | Amount | Notes |
|---|---|---|
| Boneless Chicken Breasts 🍗 | 1 ½ lb | Skinless, cut into bite-sized pieces |
| Long-Grain White Rice 🍚 | 1 ½ cups | Uncooked, not instant |
| Cream of Chicken Soup 🥫 | 2 cans | Campbell's brand preferred |
| Chicken Broth 💧 | 2 ½ cups | Low-sodium recommended |
| Unsalted Butter 🧈 | ½ cup | Melted for richness |
| Yellow Onion 🧅 | 1 whole | Medium, finely diced |
| Garlic Cloves 🧄 | 3 cloves | Minced for depth of flavor |
| Dried Thyme 🌿 | 1 tsp | Crushed for better distribution |
| Salt 🧂 | 1 tsp | Kosher or sea salt preferred |
| Black Pepper 🌶️ | ½ tsp | Freshly ground for best flavor |
| Dried Parsley 🍃 | 1 tbsp | For garnish and color |
| Paprika 🌶️ | ½ tsp | Sweet or smoked variety |
The chicken is the star here. Boneless, skinless breasts work best (thighs are fine but stay juicier). I grab mine from Costco for bulk savings, but any supermarket will do. The rice? Long-grain white absorbs the liquid perfectly—avoid minute rice, it’ll turn mushy. Campbell’s cream of chicken soup is key (the brand’s signature flavor shines), but any condensed version works in a pinch.
No cream of chicken? Swap in cream of mushroom (flavor changes slightly but still tasty). Fresh onion and garlic are ideal, but onion powder and garlic powder at half the amount get the job done. Thyme can be fresh if you’ve got it—use three times the amount. The broth? Vegetable broth works if you’re avoiding meat, but chicken broth keeps it classic.
Leftovers keep 4-5 days in the fridge, but the rice soaks up liquid over time. Reheat with a splash of broth or water to loosen. Freeze for up to 3 months—portion before freezing for easy meals later (the sauce thickens when thawed).
Why You’ll Love This Recipe
- One Pan Magic: I dump everything in a dish and let the oven do the work—no stirring, no fuss.
- Creamy Comfort: The cream of chicken soup melts into the rice, making every bite rich and satisfying.
- Feeds My Crew: Between us, this stretches effortlessly for potlucks or Sunday suppers.
- Budget Friendly: Honestly, five simple ingredients and it tastes like a million bucks.
Step-by-Step Instructions for Baked Chicken and Rice
Here’s the simple method for a creamy, comforting dish that practically makes itself.
Step 1: Prep the Chicken and Aromatics
Cut the 1.5 lb boneless chicken breasts into bite-sized pieces. I like to trim any excess fat first for even cooking. Season the chicken with 1 tsp salt, 0.5 tsp black pepper, 1 tsp dried thyme, and 0.5 tsp paprika, mixing to coat evenly.
Finely dice the 1 whole yellow onion and mince the 3 cloves garlic cloves. Sauté them in a skillet with 0.5 cup unsalted butter over medium heat for 3-4 minutes until the onion softens. This builds a flavor base that infuses the entire dish.
Step 2: Combine All Ingredients in Baking Dish
In a greased 9×13-inch baking dish, spread the 1.5 cups long-grain white rice in an even layer. Pour the sautéed onion, garlic, and butter mixture over the rice. Add the seasoned chicken pieces on top, distributing them evenly.
In a separate bowl, whisk together the 2 cans cream of chicken soup and 2.5 cups chicken broth until smooth. Pour this mixture over the chicken and rice in the dish. Gently stir to combine, making sure the rice is fully submerged in liquid.
Step 3: Bake Until Creamy and Golden
Cover the dish tightly with aluminum foil and bake at 375°F for 45 minutes. The rice will absorb the liquid and begin to swell. After 45 minutes, remove the foil and give everything a gentle stir to redistribute the ingredients.
Return the dish to the oven, uncovered, and bake for another 20-25 minutes until the chicken is cooked through and the top is lightly golden brown. The sauce should be bubbling around the edges and the rice tender with no crunch.
Step 4: Rest and Garnish for Serving
Remove the baking dish from the oven and let it rest for 5-10 minutes. This allows the sauce to thicken slightly and the flavors to meld together. Sprinkle the 1 tbsp dried parsley evenly over the top just before serving for a pop of color.
The final dish should have creamy rice with tender chicken pieces throughout, and a golden, slightly crispy top layer. The sauce will be rich and velvety, coating every bite perfectly.
Pro Tips For Making Campbell’S Baked Chicken And Rice
- Precook the Rice: Parboil the rice for 5 minutes before baking—it guarantees even cooking and prevents that dreaded crunchy center. I learned this the hard way after serving undercooked rice to dinner guests.
- Season the Chicken First: Salt and pepper those chicken breasts before searing, not just after. More salt than you think, especially since the cream of chicken soup is already mild.
- Skip the Overmixing: Stir the rice and soup mixture just until combined—overworking it turns the dish gummy. Sounds weird, but it works: the rice stays light and separate.
- Use Hot Broth: Heat the chicken broth before adding it to the baking dish. Cold broth slows down cooking and can leave the rice unevenly done—I was skeptical until I tried it.
Troubleshooting Great campbells baked chicken and rice
Rice Too Mushy
If your rice turns out mushy, you likely used instant rice or overcooked it. Stick to long-grain white rice and check for doneness at 1 hour total. Uncover earlier if the top browns too fast. 💡
Sauce Too Thin
This usually means the rice didn’t absorb enough liquid. Let it rest uncovered for 10-15 minutes after baking. If still thin, return to the oven at 350°F for 10 minutes to evaporate excess moisture.
Chicken Overcooked
Cut chicken into even, 1-inch pieces for uniform cooking. If using thighs, reduce baking time by 5-10 minutes. Check internal temp at 165°F with a meat thermometer.
Dry Top Layer
Cover the dish tightly with foil for the first 45 minutes. If the top dries before the rice is done, drizzle ¼ cup chicken broth over it and re-cover with foil.
Uneven Cooking
Stir the mixture gently halfway through baking to redistribute ingredients. Make sure your oven is fully preheated to 375°F before inserting the dish.
Bland Flavor
Boost flavor by adding 1 tsp garlic powder or ½ tsp onion powder with the seasonings. A pinch of cayenne pepper adds subtle heat. Taste before serving and adjust salt as needed. 🌟
Nutrition Facts
Frequently Asked Questions
Can I use chicken thighs instead of breasts?
Use 1.5 lb boneless thighs and reduce baking time by 5-10 minutes. Thighs stay juicier and add richer flavor to the dish.
What if I don’t have cream of chicken soup?
Substitute with cream of mushroom or celery soup for a similar texture. The flavor will differ slightly but still taste delicious.
How do I prevent the rice from getting mushy?
Use only long-grain white rice and check doneness at 1 hour total. Avoid instant rice, which turns soft too quickly.
Can I make this ahead of time?
Yes! Assemble everything in the baking dish, cover, and refrigerate up to 24 hours. Add 10 minutes to the baking time if starting cold.

- Jollof Rice Sauce Recipe: West African Tomato and Spice Infusion - September 25, 2026
- Japanese Rice Soup Recipe: Umami-Rich Comfort in a Bowl - September 25, 2026
- Homemade Cream Of Rice Recipe: Silk-Smooth Breakfast in Minutes - September 25, 2026