
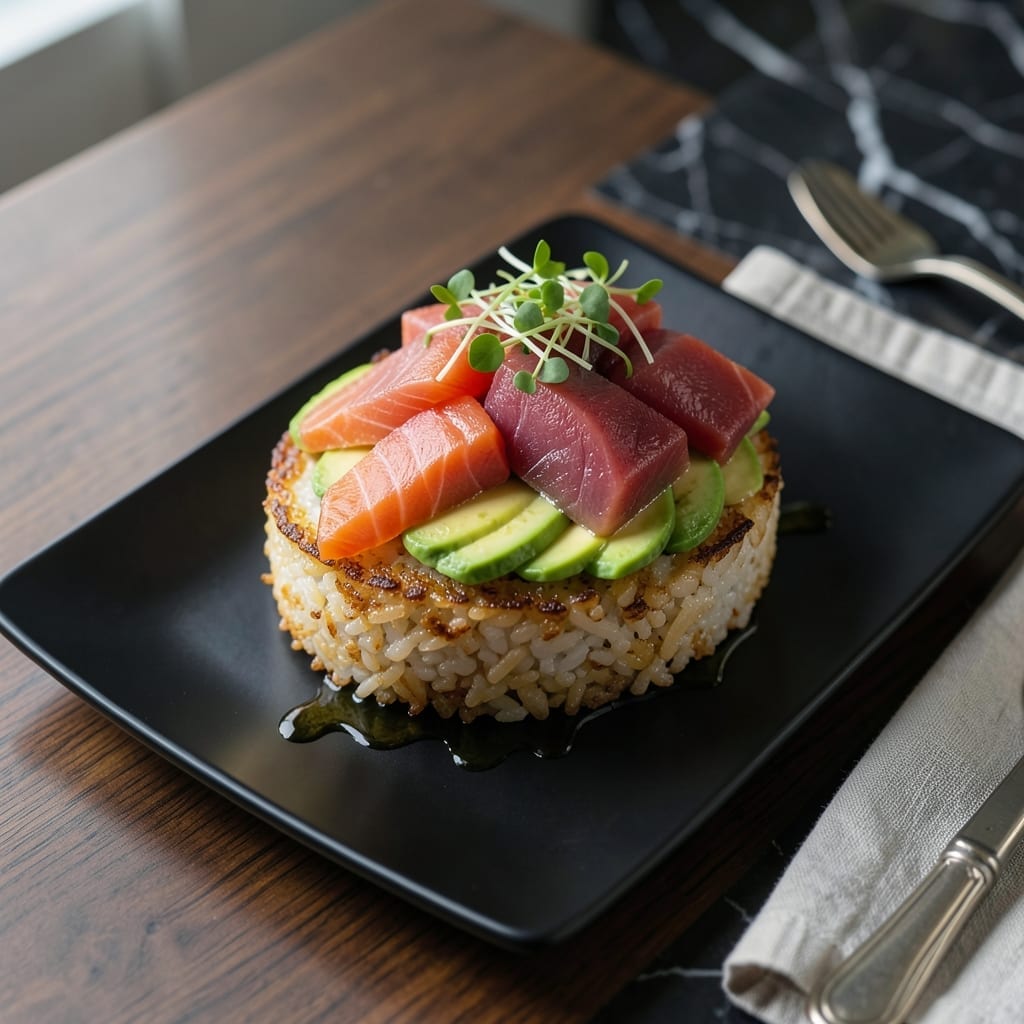
This recipe transforms traditional sushi into a texturally exciting experience with golden crispy rice as its foundation. The contrast between the crunchy exterior and the fresh fillings creates a perfect bite every time.
The key lies in pressing the seasoned rice into a thin layer and pan-frying it until it develops a satisfying crunch. Toppings like fresh avocado, cucumber, and sashimi-grade fish elevate the dish while keeping it light and flavorful.
Each piece delivers a balance of textures and flavors, from the crispy base to the tender, fresh ingredients on top. The result is a dish that feels indulgent yet remains true to sushi’s clean, bright essence.
Serve immediately while the rice is still warm and crisp. This method ensures every bite stays as satisfying as the first.
Ingredients for Crispy Rice Sushi
Transform sushi night with golden crispy rice and vibrant fresh toppings for all.
| Ingredient | Amount | Notes |
|---|---|---|
| Sushi Rice 🍚 | 2 cups | Short-grain, rinsed until clear |
| Rice Vinegar 🍶 | ¼ cup | Seasoned or plain variety |
| Granulated Sugar 🍚 | 1 tbsp | Dissolved in vinegar mixture |
| Sea Salt 🧂 | 1 tsp | Fine grain for even distribution |
| Sashimi-Grade Salmon 🐟 | ½ lb | Fresh, skinless, thinly sliced |
| Sashimi-Grade Tuna 🐟 | ½ lb | Fresh, skinless, thinly sliced |
| Avocado 🥑 | 1 whole | Ripe, thinly sliced |
| Persian Cucumber 🥒 | 1 whole | Julienned or thinly sliced |
| Neutral Oil 🫒 | ¼ cup | For pan-frying rice layers |
| Soy Sauce 🥢 | ¼ cup | For dipping, low-sodium preferred |
| Wasabi 🌿 | 2 tbsp | Prepared, for serving |
| Pickled Ginger 🌸 | ¼ cup | Thinly sliced, for serving |
| Sesame Seeds 🌰 | 1 tbsp | Toasted, for garnish |
| Nori Sheets 🍱 | 2 sheets | Cut into thin strips for garnish |
The rice foundation demands short-grain sushi rice—no substitutions. Nishiki or Koshihikari brands deliver authentic texture. Rinse thoroughly until water runs clear to remove excess starch, which prevents crispiness. For the fish, sashimi-grade salmon and tuna are non-negotiable; source from reputable seafood markets like Whole Foods or ask your fishmonger for the freshest cut.
No fresh fish on hand? Smoked salmon works in a pinch, though texture differs. For vegetarians, swap fish for marinated tofu or avocado-only pieces. The rice vinegar must be seasoned (with sugar and salt) or you’ll need to add extra sugar and salt yourself. Persian cucumbers are ideal for their thin skin, but English cucumbers work too (peel if skin is tough).
Press and fry rice just before serving—it loses crispness quickly. Store raw fish in the coldest part of your fridge for up to 24 hours. Assemble pieces immediately after frying and serve warm. Leftovers? Not ideal, but rice keeps 2 days in the fridge (re-crisp in a pan).
Why You’ll Love This Recipe
- No-Fuss Assembly: I just press rice into a pan, crisp it up, and top with salmon—no rolling required.
- Sweet-Savory Crunch: That caramelized rice vinegar and sugar combo with the crispy edges? Ridiculously good.
- Lunchbox Hero: I pack these for work and they stay perfect all day—no soggy sushi here.
- Stretches Far: One batch feeds us for two meals, and the ingredients are all pantry staples except the salmon.
Step-by-Step Instructions for Crispy Rice Sushi
Master the technique for achieving perfectly golden, crisp layers with fresh, vibrant toppings.
Step 1: Prepare and Season the Sushi Rice
Begin by rinsing the 2 cups Sushi Rice under cold water until the water runs completely clear. This removes excess starch and prevents the rice from becoming gummy. Drain thoroughly in a fine-mesh sieve for 10 minutes.
Cook the rice according to package instructions. While still warm, gently fold in a mixture of 0.25 cup Rice Vinegar, 1 tbsp Granulated Sugar, and 1 tsp Sea Salt dissolved together. Use a cutting motion with a rice paddle to avoid crushing the grains. The rice should be sticky yet distinct, with a subtle sweet-savory balance.
Step 2: Press and Chill the Rice Layers
Line a 9×9-inch baking dish with parchment paper. Spread half of the seasoned rice evenly across the bottom, pressing firmly with a spatula to create a compact, even layer. The pressure is critical—this ensures the rice holds together when pan-fried.
Repeat with the remaining rice to create a second layer. Cover with plastic wrap and refrigerate for at least 2 hours. Chilling firms the rice, making it easier to slice into clean, crispy rectangles. If you’re short on time, a 30-minute freeze can speed up the process, but the texture won’t be as refined.
Step 3: Pan-Fry for Golden Crispness
Heat 0.25 cup Neutral Oil in a large nonstick skillet over medium heat. Once the oil shimmers but doesn’t smoke, carefully add the chilled rice layers. Fry undisturbed for 4-5 minutes until the bottom is deep golden brown and crispy.
Flip the rice carefully using a large spatula—it’s fragile at this stage. If it cracks, press the edges back together gently. Fry the second side for another 3-4 minutes until equally crisp. Transfer to a paper towel-lined plate to drain excess oil, then slice into rectangles while still warm.
Step 4: Assemble with Fresh Toppings
Arrange the crispy rice rectangles on a serving platter. Top with thinly sliced 0.5 lb Sashimi-Grade Salmon and 0.5 lb Sashimi-Grade Tuna, followed by slices of 1 whole Avocado and 1 whole Persian Cucumber. The contrast of cool, fresh fish against the hot, crispy rice is essential.
Garnish with 1 tbsp Sesame Seeds and thin strips of 2 sheets Nori Sheets. Serve immediately with 0.25 cup Soy Sauce, 2 tbsp Wasabi, and 0.25 cup Pickled Ginger on the side. The rice loses its crispness quickly, so timing is everything.
Pro Tips For Making Crispy Rice Sushi
- Press Hard: When shaping the rice, pack it tightly into the pan—about 10 seconds of firm pressure with a spatula. I learned this the hard way after my first batch fell apart in the oil.
- Chill the Rice: Spread the cooked sushi rice on a tray and let it cool for 15 minutes before pressing. Hot rice steams instead of crisps, and nobody wants soggy edges.
- Use Neutral Oil: Skip the sesame or olive oil for frying—neutral oils like canola or vegetable can handle the high heat without burning. After ruining a batch with butter, I finally switched.
- Dry the Salmon: Pat the sashimi-grade salmon with a paper towel before slicing to remove excess moisture. Sounds tedious, but it prevents the fish from making the crispy rice wet.
Wine and Beer Pairings for This crispy rice sushi
Crisp White Wines
A dry Sauvignon Blanc from New Zealand cuts through the richness with its bright acidity and citrus notes. I love how the grapefruit and lime flavors complement the fresh fish without overpowering the dish. 🍷
Light-Bodied Reds
For red wine lovers, a chilled Pinot Noir from Oregon offers delicate red fruit flavors that won’t compete with the sushi. The subtle earthiness pairs beautifully with the crispy rice and fresh toppings.
Japanese Lager
A crisp Sapporo or Asahi Super Dry provides clean, refreshing contrast to the rich, crispy textures. The light body and mild bitterness cleanse your palate between bites. 🍺
Wheat Beers
A German Hefeweizen with its banana and clove notes offers an interesting flavor interplay. The effervescence helps lift the richness of the dish, making each bite feel lighter.
Sake Options
Try a dry Junmai sake served slightly chilled for an authentic pairing. The clean, mineral notes enhance the fresh fish while respecting the dish’s Japanese roots. I recommend Dassai 39 for its exceptional quality.
Nutrition Facts
Frequently Asked Questions
Can I make this ahead of time?
Press and chill the rice layers up to 1 day in advance, but fry just before serving. The crispiness lasts only 10-15 minutes after cooking.
What if my rice cracks when flipping?
Gently press the edges back together with your spatula. Use medium heat and ensure the oil is hot enough to create a firm crust quickly.
Can I use a different type of rice?
Stick to short-grain sushi rice for the right stickiness and crisp potential. Jasmine or basmati won’t hold together or crisp properly.

- Rice Pudding Recipe With Eggs and Milk: Old-Fashioned Custard-Style Comfort - September 30, 2026
- Rice Noodle Sauce Recipe: Bold Umami Depth for Authentic Stir-Fry - September 30, 2026
- Rice Pilaf Recipe: Fragrant Basmati With Toasted Vermicelli - September 30, 2026