
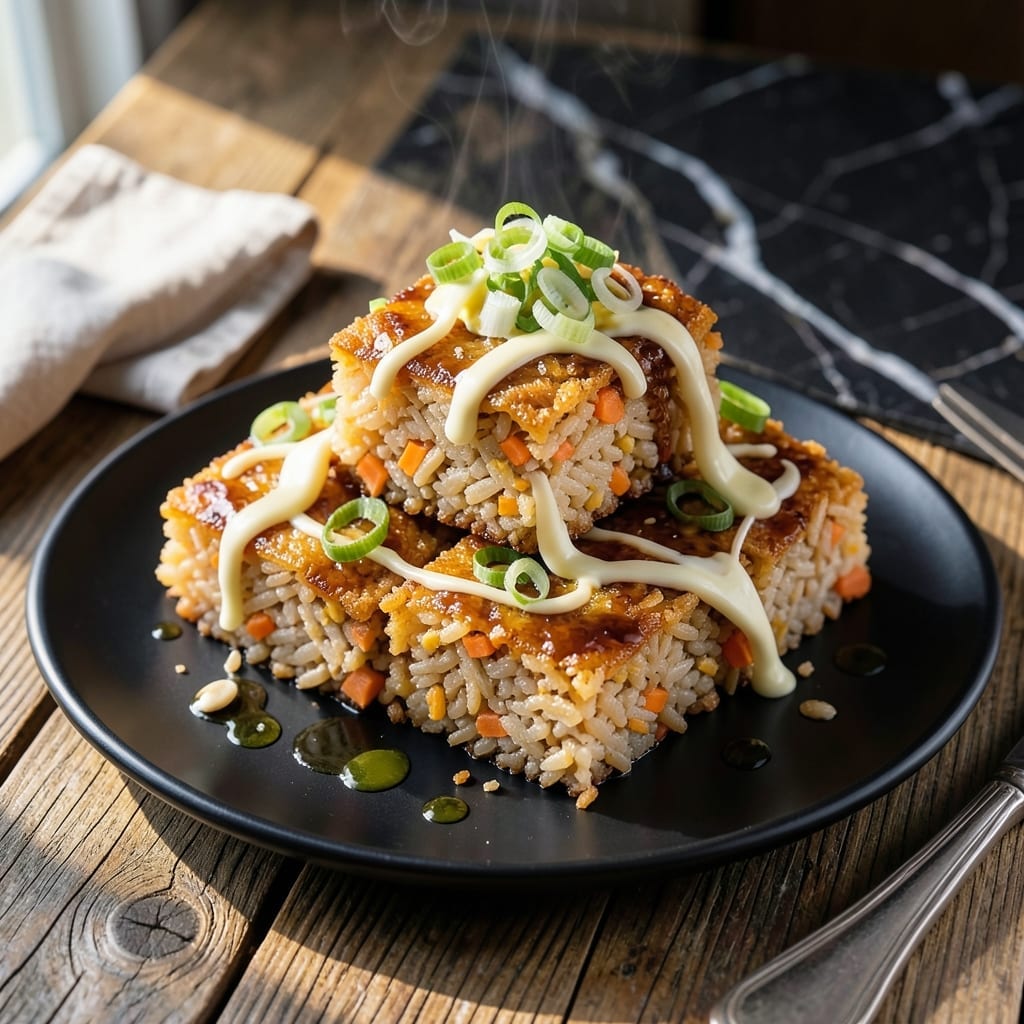
This recipe transforms leftover rice into golden, crispy squares with rich umami depth. I developed it after too many takeout containers piled up in my tiny Boston kitchen.
The technique is precise: pressing cooked rice into a pan creates those signature crispy edges while keeping centers tender. A quick sear at medium-high heat ensures even browning without burning.
Each bite delivers textural contrast—shatteringly crispy exterior giving way to soft, flavorful rice inside. The soy-garlic seasoning adds savory depth that makes these irresistible.
Perfect as a side or light main, these squares hold their shape beautifully. Here’s how to achieve that ideal crispness every time.
Ingredients for Fried Rice Squares
Transform day-old rice with these pantry staples into golden, crispy-edged squares with savory depth.
| Ingredient | Amount | Notes |
|---|---|---|
| Cooked White Rice 🍚 | 4 cups | Day-old, chilled overnight preferred |
| Large Eggs 🥚 | 2 whole | Lightly beaten for binding |
| Scallions 🧅 | 4 whole | Thinly sliced, whites and greens separated |
| Garlic Cloves 🧄 | 3 cloves | Minced for aromatic base |
| Soy Sauce 🫒 | 3 tbsp | Low-sodium preferred for control |
| Sesame Oil 🫒 | 1 tbsp | Toasted for nutty depth |
| Vegetable Oil 🫒 | 2 tbsp | Neutral flavor, high smoke point |
| Frozen Peas 🌱 | ½ cup | Thawed, patted dry |
| Carrot 🥕 | 1 whole | Finely diced for texture |
| Ground Black Pepper 🌶️ | ½ tsp | Freshly cracked for best flavor |
| Diamond Crystal Kosher Salt 🧂 | ½ tsp | Precise seasoning control |
| Oyster Sauce 🫒 | 1 tbsp | Optional for umami boost |
The rice is critical here. Day-old, chilled rice with lower moisture content fries up crispier than fresh. Use jasmine or long-grain white for best texture—avoid instant rice (too soft). Trader Joe’s has great pre-cooked options if you’re in a hurry. For the soy sauce, low-sodium Kikkoman allows precise seasoning control without over-salting the final dish.
No oyster sauce? Vegan oyster sauce or hoisin works at a 1:1 ratio. Fresh garlic is non-negotiable—jarred minced garlic lacks the aromatic punch. The vegetable oil can be swapped for avocado oil (higher smoke point) or peanut oil for authenticity. For extra umami, add a dash of fish sauce (or coconut aminos for vegetarian).
Pressed squares keep 3-4 days refrigerated in an airtight container. Re-crisp in a dry skillet or air fryer at 375°F for 3-4 minutes. The mixture can be prepped a day ahead—just press and sear when ready. Do not freeze after cooking (textural degradation).
Why You’ll Love This Recipe
- 20-Minute Meal: I can have these crispy-edged squares on the table faster than takeout arrives.
- Savory Umami Bomb: The garlic and soy sauce hit just right, with scallions adding that fresh finish.
- Lunchbox Hero: They hold their shape cold, so my kids actually eat their leftovers.
- Pantry MVP: Five ingredients I always have, and it still feels like a treat.
Step-by-Step Instructions for Fried Rice Squares
This method ensures maximum crispiness with a savory core in every bite.
Step 1: Sauté Aromatics and Vegetables
Heat 2 tbsp vegetable oil in a large nonstick skillet over medium-high heat. Add the minced 3 cloves garlic cloves and cook for 30 seconds until fragrant but not browned. Immediately add the finely diced 1 whole carrot and cook for 2 minutes until slightly softened.
Add the 0.5 cup frozen peas and the white parts of the 4 whole scallions (reserve greens for garnish). Stir-fry for 2 minutes until the peas are heated through and the scallion whites begin to soften. This builds the flavor base for your dish.
Step 2: Scramble Eggs and Combine with Rice
Push the vegetables to one side of the skillet and add the 2 whole large eggs. Scramble quickly with a spatula until just set but still slightly runny. Immediately add the 4 cups cooked white rice, breaking up any clumps with your spatula.
Drizzle the 3 tbsp soy sauce, 1 tbsp sesame oil, 0.5 tsp Diamond Crystal kosher salt, and 0.5 tsp ground black pepper over the rice. Add the 1 tbsp oyster sauce if using. Fold everything together gently but thoroughly to distribute the seasonings evenly.
Step 3: Press and Crisp the Rice
Reduce heat to medium and spread the rice mixture evenly across the skillet. Press down firmly with your spatula to create an even layer. Cook undisturbed for 4-5 minutes until the bottom develops a golden brown crust.
Resist the urge to stir during this time—this is what creates the crispy edges that define this dish. You’ll hear a gentle sizzle as the crust forms. Use your spatula to check the color; it should be deeply golden before flipping.
Step 4: Flip and Finish
Carefully flip the rice in sections, scraping up the crispy bits as you go. Press down again and cook for another 3-4 minutes until the new bottom layer is equally crispy. The rice should now have a consistent golden color with visible crispy edges throughout.
Taste and adjust seasoning if needed, though the soy and oyster sauces typically provide sufficient saltiness. The texture should be crispy at the edges with tender grains in the center.
Step 5: Serve with Garnish
Transfer the fried rice to a serving platter, breaking it into square portions to highlight the crispy edges. Garnish with the reserved scallion greens. Each serving should feature a mix of crispy exterior and soft, flavorful center.
The squares should hold their shape briefly when plated, with the crispy crust providing textural contrast to the tender rice within. Serve immediately while the edges are at their peak crispness.
Pro Tips For Making Fried Rice Squares
- Chill the Rice: Use day-old, refrigerated rice—it’s drier and fries up fluffier instead of mushy. I learned this the hard way after making sad, soggy squares with fresh rice.
- Scramble Eggs First: Cook the beaten eggs separately in the pan first, then remove and mix back in later. This guarantees soft, distinct egg pieces instead of rubbery bits lost in the rice.
- High Heat Only: Crank the heat to medium-high and keep it there. Sounds obvious, but low heat turns your squares into a steamed, sticky mess instead of crispy-edged perfection.
- Soy Sauce Last: Add soy sauce at the very end of cooking to prevent the rice from turning gray and absorbing too much salt. A tablespoon at the finish gives color and flavor without overpowering.
Troubleshooting This Recipe
Rice Too Wet
If your rice isn’t crisping, it’s likely too moist. Use day-old, chilled rice and spread it in a thin layer on a baking sheet for 10 minutes before cooking to evaporate excess moisture. I learned this trick after a soggy batch in my tiny Boston kitchen. 💡
Squares Won’t Hold
For better cohesion, ensure your 2 whole eggs are well-beaten and fully cooked before mixing with rice. Press the mixture firmly into the skillet and let it set for 5 minutes before flipping. A nonstick pan helps too.
If still crumbling, chill the mixture for 20 minutes before pressing to help it bind.
Uneven Browning
Hot spots cause this. Use medium-high heat and rotate your pan occasionally for even cooking. If using a thin pan, reduce heat to medium to prevent burning.
Burnt Garlic
Garlic burns quickly. Cook your 3 cloves garlic for only 30 seconds until fragrant, then add veggies immediately. Pull the pan off heat if it’s browning too fast.
Bland Flavor
Boost seasoning with an extra 1 tbsp soy sauce or 1 tsp Diamond Crystal kosher salt. A splash of oyster sauce or fish sauce adds depth. Taste before serving and adjust. 🌟
Nutrition Facts
Frequently Asked Questions
Can I use fresh rice instead of day-old?
Fresh rice holds too much moisture and won’t crisp properly. Spread freshly cooked rice on a baking sheet and refrigerate uncovered for 1-2 hours to dry it out before using. This mimics day-old rice texture.
What’s the best pan for crispy edges?
A heavy nonstick skillet or cast iron works best. These distribute heat evenly and prevent sticking when flipping. Avoid thin pans—they create hot spots and burn the rice.
How do I make these ahead of time?
Prepare the mixture and press into the pan, but don’t cook. Cover and refrigerate up to 12 hours. When ready, cook as directed, adding 1-2 minutes extra to crisp the chilled rice.

- Gambia Jollof Rice Recipe: West African One-Pot Spice Fusion - October 5, 2026
- Cream of Wild Rice Soup Recipe Minnesota: Northwoods Creaminess With Foraged Grains - October 5, 2026
- Frozen Cauliflower Fried Rice Recipe: Quick Low-Carb Wok Magic - October 5, 2026