
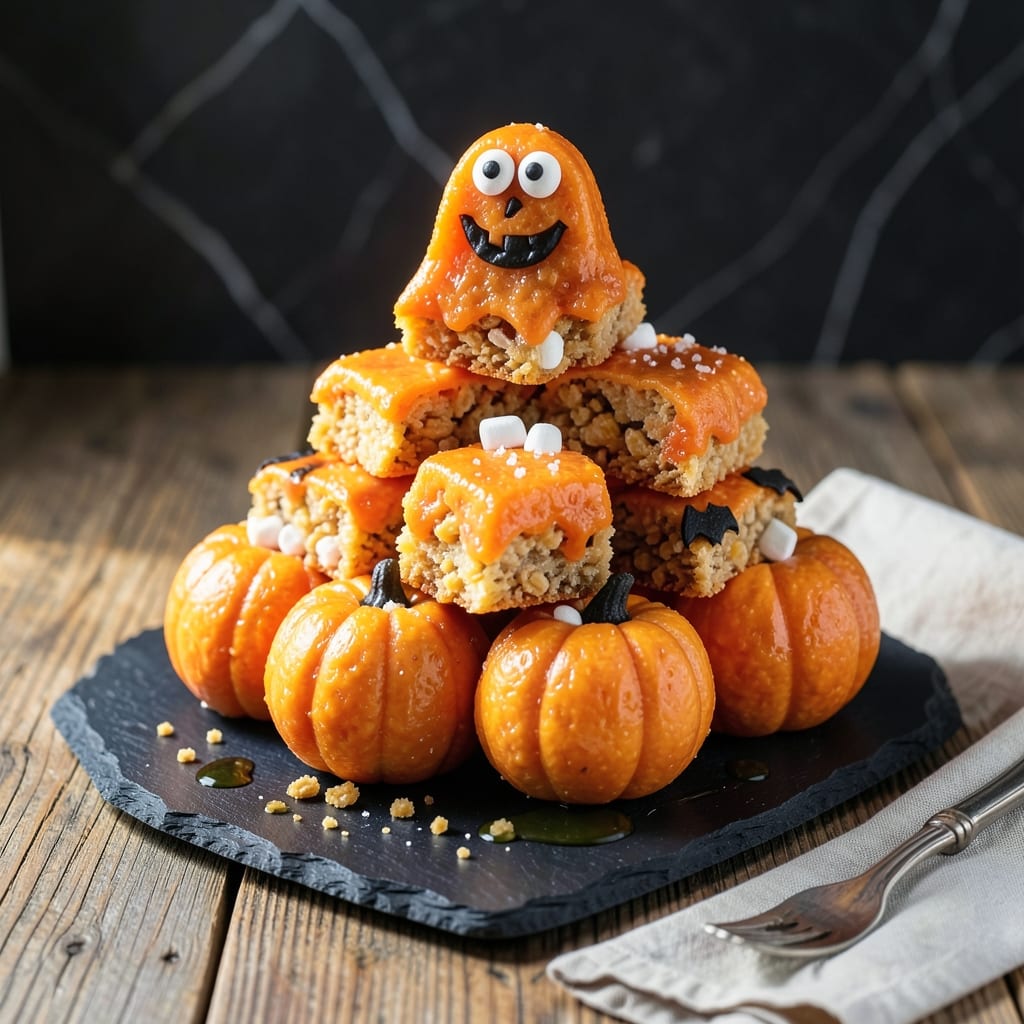
These festive treats bring Halloween fun to your kitchen with minimal effort and maximum impact. The classic combination of crispy cereal and melted marshmallows transforms into spooky shapes perfect for parties.
With just a few ingredients and 15 minutes, you can create edible ghosts, pumpkins, or monsters that delight kids and adults alike. The secret is working quickly while the mixture is still warm and pliable.
Ingredients for Halloween Rice Krispies
Minimal ingredients, maximum Halloween fun. Perfect for spooky party treats.
| Ingredient | Amount | Notes |
|---|---|---|
| Rice Krispies Cereal 🥣 | 6 cups | Standard or generic brand works |
| Mini Marshmallows 🍬 | 10 oz | Regular or vegetarian marshmallows |
| Unsalted Butter 🧈 | 3 tbsp | For melting with marshmallows |
| Vanilla Extract 🌿 | 1 tsp | Pure extract for best flavor |
| Salt 🧂 | ¼ tsp | Fine grain preferred |
| Orange Food Coloring 🎨 | ½ tsp | Gel or liquid for pumpkin shapes |
| Black Food Coloring 🖤 | ¼ tsp | Gel for monster details |
| White Chocolate Chips 🍫 | ½ cup | For ghost decoration |
| Candy Eyes 👀 | 1 package | For monster or ghost faces |
| Cooking Spray 🧴 | 1 can | For greasing hands and tools |
The marshmallows are the foundation here. Look for vegetarian marshmallows (Dandies is a great brand) if you want to skip gelatin. Jet-Puffed or store brands work fine too—just avoid stale ones. The cereal can be any crispy rice cereal (even off-brand), but freshness matters. If your box has been open for months, grab a new one. The butter should be unsalted so you can control the salt level.
No orange food coloring? Crushed cheese puffs or paprika can tint the mix for pumpkins (the color will be muted but still fun). Out of white chocolate? Melted almond bark works for ghost drizzles. Candy eyes not available? Use chocolate chips or mini M&Ms for monster eyes. The vanilla extract can be swapped with almond extract for a different flavor twist.
Store treats in an airtight container at room temperature for up to 3 days. If it’s humid, keep them in the fridge to prevent stickiness. Best made the same day, but they’ll still hold their shape for 24-48 hours if stored properly.
Why You’ll Love This Recipe
- 5-Minute Magic: I melt the butter, dump in the marshmallows, and before the cereal even hits the pot, it’s done. Honestly, the fastest no-bake treat I know.
- Goodey Gooey: That first bite where the crispy cereal gives way to the stretchy marshmallow—pure comfort in every square.
- Party Starter: I shape them into pumpkins, ghosts, or just plain squares, and they vanish from the Halloween table faster than the candy.
Step-by-Step Instructions for Halloween Rice Krispies Treats
Here’s the method. Straightforward, tested, works every time.
Step 1: Melt Butter and Marshmallows with Color
In a large saucepan, melt the 3 tbsp Unsalted Butter over low heat. I keep the temperature gentle to prevent scorching. Once melted, add all 10 oz Mini Marshmallows and stir constantly with a silicone spatula until completely smooth.
Remove from heat and immediately stir in the 1 tsp Vanilla Extract, 0.25 tsp Salt, and 0.5 tsp Orange Food Coloring for pumpkin shapes. For monster details, divide the mixture and stir 0.25 tsp Black Food Coloring into half. Work quickly—the mixture thickens as it cools.
Step 2: Combine with Rice Krispies Cereal
Working fast, add all 6 cups Rice Krispies Cereal to the marshmallow mixture. I use a wooden spoon to fold everything together until every piece is evenly coated. The cereal should be fully saturated but not soggy—you want it to hold its shape.
Spray your hands lightly with the Cooking Spray to prevent sticking, then press the mixture firmly into a 9×13-inch pan lined with parchment. For pumpkin shapes, use an ice cream scoop to portion orange mixture into balls before it sets.
Step 3: Shape and Decorate the Spooky Treats
Let the treats cool for 10 minutes before shaping. For ghostly figures, flatten white portions slightly and press on Candy Eyes while still warm. For monsters, combine orange and black portions creatively, using the Candy Eyes for faces.
I like to use my fingers to create texture—slight indentations for mouths or grooves for hair. The treats should hold their shape but still feel slightly pliable. If they cool too much, pop them back in the microwave for 10-15 seconds to soften.
Step 4: Add White Chocolate Details
Melt the 0.5 cup White Chocolate Chips in the microwave in 20-second bursts, stirring between each until smooth. Transfer to a piping bag or zip-top bag with a tiny corner snipped off.
Pipe ghostly drips, monster scars, or spiderwebs onto your cooled treats. For ghost shapes, create floating wisps by piping white chocolate in wavy lines. Let the chocolate set for 15-20 minutes at room temperature or 5 minutes in the refrigerator for faster results.
Pro Tips For Making Halloween Rice Krispies
- Melt Butter Low: Use medium-low heat when melting the butter—too high and the marshmallows will scorch before they even soften. I learned this the hard way after ruining a batch with burnt sugar flavor.
- Use Fresh Marshmallows: Skip the stale mini marshmallows; they won’t melt as smoothly and can leave your treats grainy. Fresh ones blend seamlessly into the butter for that perfect gooey texture.
- Press While Warm: Shape the Rice Krispies mixture into molds or pans immediately while it’s still warm and pliable. Wait too long and it’ll harden, making it tough to form Halloween shapes without cracking.
- Add Vanilla Last: Stir in the vanilla extract after removing the marshmallow mixture from heat—adding it too early can make the flavor bitter. A splash at the end gives just the right aromatic boost.
Flavor Customization for This Dish
Spooky Color Variations
For a graveyard theme, mix black food coloring into half the batch and shape into tombstones. Use the white chocolate to pipe RIP details. I like to add crushed Oreo cookies for a dirt effect around the base. 💀
Monster Mash
Create multi-colored monsters by dividing the mixture and tinting with purple, green, or red food coloring. Shape into irregular lumps, then press on candy eyes and pipe white chocolate teeth. The more uneven, the better for a spooky look.
Pumpkin Patch
Use only the orange food coloring and shape into small balls. Press a green Mike and Ike or sour belt on top as a stem. For extra detail, use a toothpick to create ridges like a real pumpkin.
Ghostly Figures
Keep the mixture white and shape into ovals. Press on two candy eyes and use the melted white chocolate to pipe a floating mouth. I find that slightly flattening the bottom helps them stand upright on serving trays.
Spiderweb Designs
Flatten white portions into circles, then pipe concentric white chocolate circles. Drag a toothpick from the center outward to create the web pattern. Add a plastic spider ring on top for a fun, edible decoration. ✨
Flavor Boosters
Add 1 tsp cinnamon or ½ tsp pumpkin spice to the marshmallow mixture for a seasonal twist. A pinch of espresso powder enhances the chocolate flavor if you’re using chocolate cereal. These small additions elevate the taste without overpowering.
Nutrition Facts
Frequently Asked Questions
Can I use regular marshmallows instead of mini?
Yes, but cut them into smaller pieces first for even melting. 10 oz of regular marshmallows equals about 40 large ones. They melt the same but take slightly longer.
How do I keep the treats from sticking to my hands?
Lightly coat your hands with cooking spray or butter before shaping. Reapply as needed—this prevents the warm mixture from clinging.
Can I make these ahead of time?
Store in an airtight container at room temperature for up to 2 days. Avoid refrigeration unless it’s humid, as it can make them too hard.
What if my food coloring makes the mixture too wet?
Add a little extra cereal to balance the texture. Gel coloring works best as it’s more concentrated and won’t thin the mixture like liquid dyes.

- Ground Beef Rice and Beans Recipe: Slow-Simmered Savory Harmony - October 17, 2026
- Guyanese Fried Rice Recipe: Caribbean Spice With Wok-Charred Aromatics - October 17, 2026
- Hakka Thunder Tea Rice Recipe: Wok-Charred Herbal Infusion - October 17, 2026