
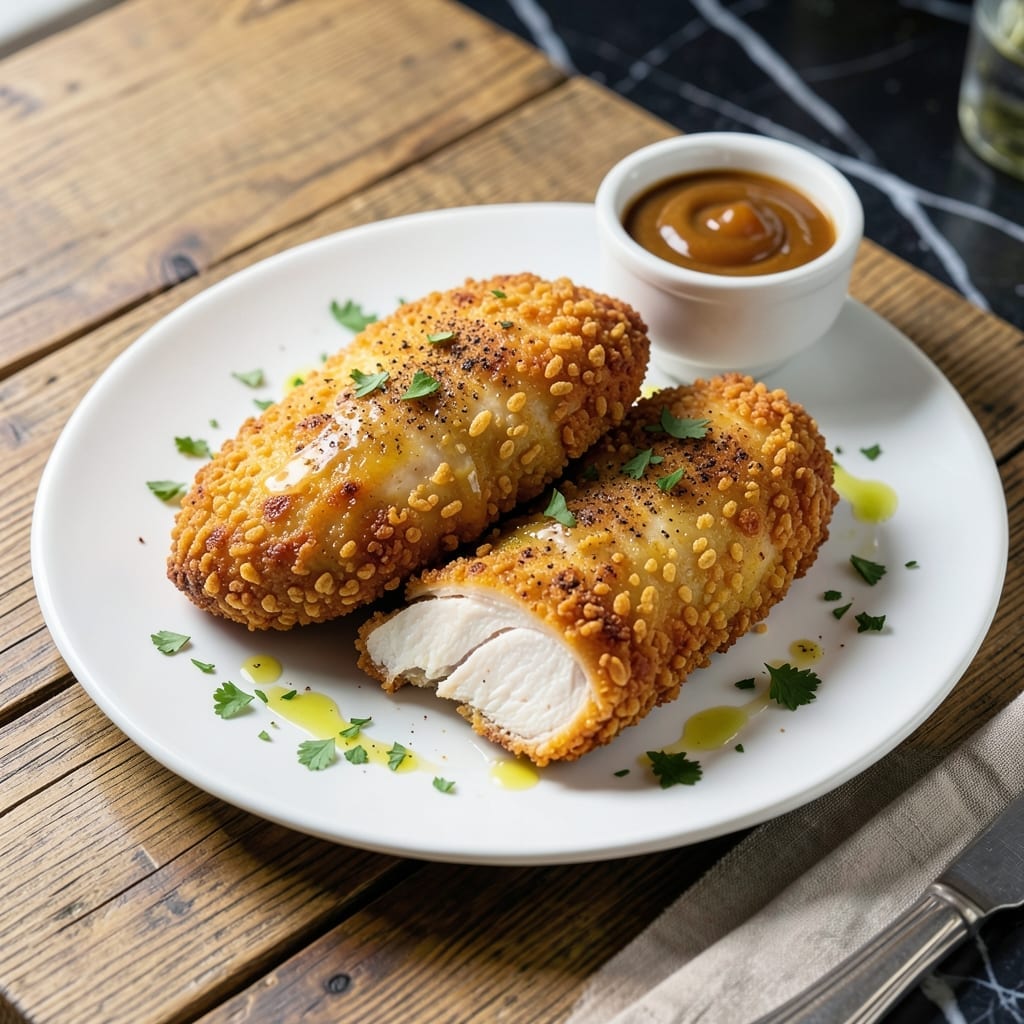
This baked chicken delivers an unexpected crispy texture using a secret pantry ingredient. The cereal coating creates a golden finish that stays crunchy even after baking, without deep frying.
I developed this method to solve the problem of soggy breaded chicken. The Rice Krispies toast in the oven, forming a light but sturdy crust that adheres perfectly to each piece. It’s a foolproof technique for juicy meat with satisfying crunch.
Each bite offers tender chicken inside with a shatteringly crisp exterior. The cereal’s subtle sweetness balances savory seasonings for a well-rounded flavor. This dish proves that simple ingredients can create extraordinary results.
Serve with roasted vegetables or a fresh salad for a complete meal. The contrast between the crispy coating and moist chicken makes every bite memorable.
Ingredients for Rice Krispie Baked Chicken
Simple pantry ingredients transform chicken into a crispy, golden masterpiece without deep frying.
| Ingredient | Amount | Notes |
|---|---|---|
| Chicken Breasts 🍗 | 1 ½ lb | Boneless, skinless, pounded even |
| Rice Krispies Cereal 🥣 | 3 cups | Crushed into coarse crumbs |
| All-Purpose Flour 🌾 | ½ cup | For initial dredging |
| Large Eggs 🥚 | 2 whole | Beaten for binding |
| Paprika 🌶️ | 1 tsp | Sweet or smoked variety |
| Garlic Powder 🧄 | 1 tsp | Freshly ground preferred |
| Onion Powder 🧅 | 1 tsp | Balances sweetness of cereal |
| Dried Oregano 🍃 | ½ tsp | Mediterranean oregano ideal |
| Salt 🧂 | 1 tsp | Diamond Crystal kosher preferred |
| Black Pepper 🌶️ | ½ tsp | Freshly ground for best flavor |
| Unsalted Butter 🧈 | 4 tbsp | Melted for moisture in coating |
| Olive Oil 🫒 | 2 tbsp | For drizzling before baking |
| Cayenne Pepper 🔥 | ¼ tsp | Optional for subtle heat |
The Rice Krispies are non-negotiable here—only the original variety delivers that signature crunch. For chicken, boneless, skinless breasts work best (pounded to even thickness for consistent cooking). Costco sells family packs perfect for this. The cereal should be crushed just enough to form coarse crumbs, not powder. Freshly ground spices make a noticeable difference, especially the black pepper.
No Rice Krispies? Corn Flakes at a 1:1 ratio work in a pinch, though they lack the same snap. Out of paprika? Substitute with smoked paprika for deeper flavor. The butter can be swapped for olive oil if avoiding dairy, but the flavor profile changes slightly. For extra crunch, add 1/4 cup panko breadcrumbs to the cereal mixture.
Store crushed cereal in an airtight container for up to 1 week. The baked chicken keeps 3-4 days refrigerated and reheats well in a toaster oven (microwave makes it soggy). For best results, bake just before serving to maintain that shatteringly crisp texture.
Why You’ll Love This Recipe
- One Bowl Wonder: I just dump the cereal, flour, and paprika in one bowl—no extra dishes, no fuss.
- Crispy Perfection: That Rice Krispies coating gives it the most satisfying crunch with every bite.
- Kid-Tested Favorite: Even my picky nephew cleans his plate when this is on the menu.
- Budget Stretch: A box of cereal and chicken breasts feed four for less than takeout would.
Step-by-Step Instructions for Rice Krispie Baked Chicken
Master this method for a perfectly crisp coating with juicy chicken beneath every time.
Step 1: Prepare and Season the Chicken
Begin by pounding the 1.5 lb Chicken Breasts to an even ½-inch thickness between plastic wrap. This ensures uniform cooking so every piece finishes at the same time. Pat the chicken completely dry with paper towels—this is crucial for the coating to adhere properly.
Season both sides generously with the 1 tsp Salt, 0.5 tsp Black Pepper, 1 tsp Paprika, 1 tsp Garlic Powder, 1 tsp Onion Powder, 0.5 tsp Dried Oregano, and optional 0.25 tsp Cayenne Pepper. The spices should form a visible layer on the surface.
Step 2: Create the Breading Station
Set up three shallow dishes. Place the 0.5 cup All-Purpose Flour in the first. In the second, beat the 2 whole Large Eggs until uniform. For the third, crush the 3 cups Rice Krispies Cereal into coarse crumbs and mix with the 4 tbsp Unsalted Butter (melted) to create a buttery, crispy coating.
Dredge each seasoned chicken breast in the flour, shaking off excess. Then dip into the beaten eggs, allowing any excess to drip off. Finally, press firmly into the Rice Krispies mixture, ensuring full coverage. The cereal should form a thick, textured coat that clings to the chicken.
Step 3: Arrange and Drizzle for Baking
Preheat your oven to 400°F. Arrange the breaded chicken on a wire rack set over a baking sheet. This elevation allows air to circulate underneath, preventing soggy bottoms. Lightly drizzle the 2 tbsp Olive Oil over each piece to enhance browning.
Bake for 20-22 minutes or until the coating is deep golden brown and the internal temperature reaches 165°F. The Rice Krispies will puff slightly during baking, creating an audibly crisp texture. Resist flipping—the coating is delicate until fully set.
Step 4: Rest and Serve Immediately
Remove the chicken from the oven and let it rest for 5 minutes on the rack. This brief pause allows the juices to redistribute while maintaining the coating’s crispness. The internal temperature will rise slightly during this time.
Serve immediately while hot. Each piece should have a shatteringly crisp exterior with a moist, tender interior. The cereal coating will have transformed into a savory, buttery crust with a subtle sweetness that pairs perfectly with the spiced chicken.
Pro Tips For Making Rice Krispie Baked Chicken
- Crush Finely First: Pulse the Rice Krispies in a food processor or crush them in a sealed bag with a rolling pin until they’re the texture of coarse breadcrumbs. I learned this the hard way—big pieces don’t stick well and burn easier.
- Dry the Chicken: Pat the chicken breasts bone-dry with paper towels before dredging. Sounds tedious, but it’s the only way the flour and cereal coating cling properly instead of sliding off.
- Bake at 400°F: After frying, finish the chicken in a 400°F oven for 15-20 minutes. Any lower and the coating stays soggy; any higher and the cereal burns before the chicken cooks through.
- Double-Dredge for Crunch: Dip the chicken in flour, egg, then Rice Krispies, but repeat the egg and cereal step once more. I was skeptical until I tried it—this extra layer makes the crust thick and shatteringly crisp.
Health Benefits of This Recipe
Lean Protein Power
This dish packs 38 grams of protein per serving from the chicken, supporting muscle repair and growth. Protein keeps you full longer, making it perfect for active lifestyles. The lean breast meat provides high-quality amino acids without excessive saturated fat. 💪
Low-Carb Advantage
With only 12 grams net carbs per serving, this fits well into low-carb diets. The cereal coating adds minimal carbs compared to traditional breadcrumbs. It’s an excellent alternative to fried chicken for those watching their carb intake.
Essential Minerals
The chicken provides 15% daily value of iron and 20% of selenium per serving. These minerals support immune function and thyroid health. The iron is heme iron, which your body absorbs more efficiently than plant-based iron.
Vitamin B Boost
Each serving delivers 30% of your daily B6 and 25% of niacin. These vitamins help convert food into energy and support brain health. The cereal adds a small amount of fortified vitamins, including B12.
Healthy Fats
The recipe uses 4 tbsp butter for the entire batch, keeping saturated fat moderate. You can reduce this by half without sacrificing too much crispiness. The olive oil adds heart-healthy monounsaturated fats.
Portion Control
At about 300 calories per serving, this satisfies without overindulging. Pair with steamed veggies for a balanced meal under 400 calories. The protein-to-calorie ratio makes it efficient fuel for your body. 🥗
Nutrition Facts
Frequently Asked Questions
Can I use chicken thighs instead of breasts?
Chicken thighs work well and may even stay juicier. Adjust baking time to 25-28 minutes since dark meat cooks slower. Ensure internal temperature reaches 165°F for safety.
How do I keep the coating crispy?
Use a wire rack over a baking sheet for air circulation. Avoid covering while baking—steam makes it soggy. Serve immediately for maximum crunch.
Can I make this ahead of time?
Bread the chicken up to 4 hours ahead and refrigerate uncovered. Bake just before serving for best texture. Reheating in a toaster oven helps maintain crispiness.
What’s the best way to crush the cereal?
Place Rice Krispies in a sealed bag and gently roll with a rolling pin. Aim for coarse crumbs, not powder. This texture creates the best crispy coating.

- Jollof Rice Sauce Recipe: West African Tomato and Spice Infusion - September 25, 2026
- Japanese Rice Soup Recipe: Umami-Rich Comfort in a Bowl - September 25, 2026
- Homemade Cream Of Rice Recipe: Silk-Smooth Breakfast in Minutes - September 25, 2026