
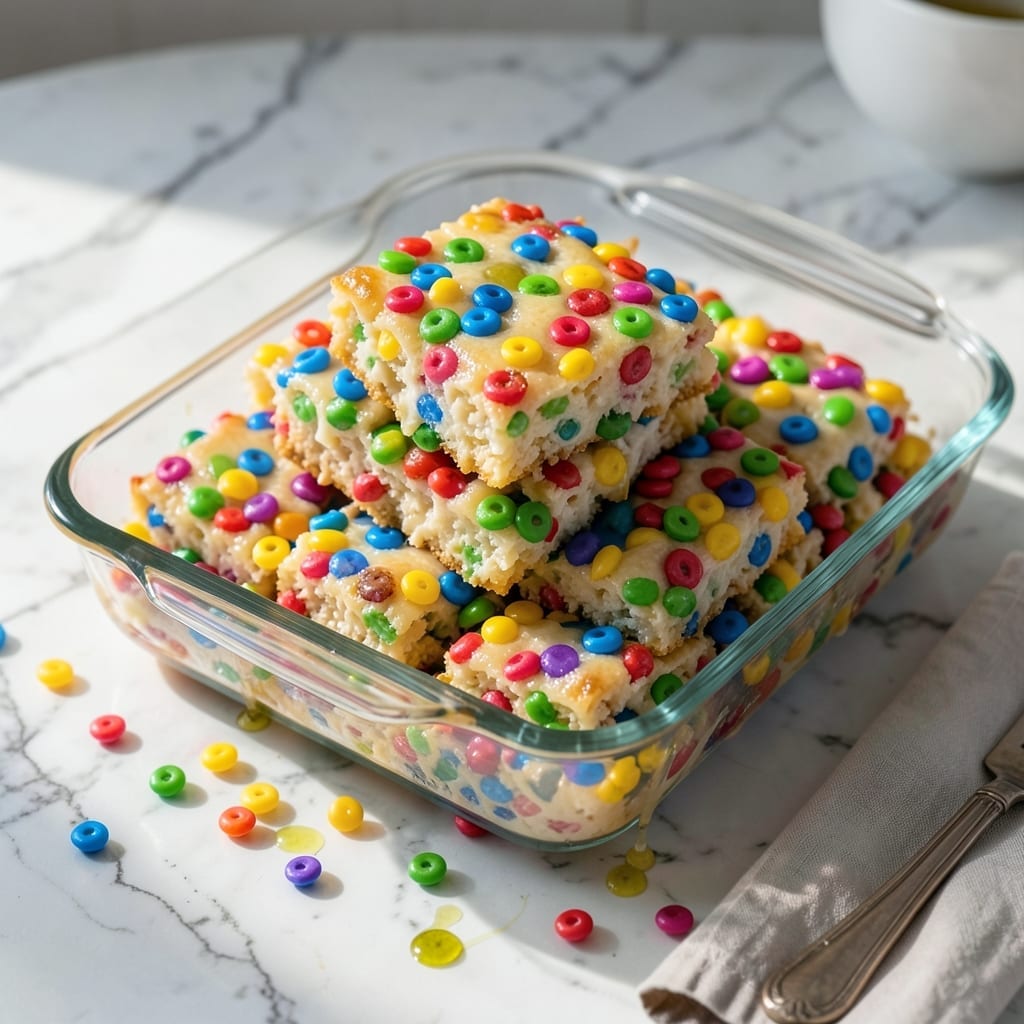
This recipe transforms a classic into a vibrant, rainbow-colored treat that kids and adults adore. The crispy texture comes from perfectly melted marshmallows binding every piece of cereal.
With just a few simple ingredients and 10 minutes of active time, you can create these cheerful squares that are as fun to make as they are to eat. The Fruit Loops add a playful twist while keeping that signature crunch.
Ingredients for Fruit Loop Rice Crispy Treats
Bright cereal, gooey marshmallows, and butter create this colorful, crispy treat everyone loves.
| Ingredient | Amount | Notes |
|---|---|---|
| Fruit Loops Cereal 🌈 | 6 cups | Rainbow-colored for vibrant appearance |
| Mini Marshmallows ⚪ | 10 oz | Fresh for best melt |
| Unsalted Butter 🧈 | ¼ cup | Or vegan butter for dairy-free |
| Vanilla Extract 🌿 | 1 tsp | Pure for best flavor |
| Salt 🧂 | ¼ tsp | Fine grain for even distribution |
| Vegetable Oil 🫒 | 1 tsp | For greasing pan |
| Granulated Sugar 🍚 | 2 tbsp | Optional for extra sweetness |
The marshmallows are key—Jet-Puffed or Kraft brands melt the smoothest for that perfect sticky bind. Use fresh mini marshmallows; the stale ones won’t melt evenly. For the cereal, any generic Fruit Loops work, but Froot Loops by Kellogg’s give the best color pop. The butter should be unsalted so you control the salt content—Land O’Lakes is a reliable choice if you’re going dairy.
Need a vegan version? Swap the butter for Earth Balance and use Dandies vegan marshmallows—they melt just like the real thing. Out of Fruit Loops? Any colorful cereal works, but avoid the ones with chocolate pieces (they’ll bleed). The vanilla extract can be swapped for almond extract at half the amount for a different flavor profile.
These keep in an airtight container at room temperature for 3 days—though they never last that long. For longer storage, freeze for up to 2 months. Slice before freezing for easy portioning. Press the mixture firmly into the pan for clean, crisp squares.
Why You’ll Love This Recipe
- Five Ingredient Magic: I love that this comes together with just Fruit Loops, marshmallows, butter, vanilla, and a pinch of salt—no fancy shopping required.
- Nostalgic Crunch: That first bite of crispy cereal bound by gooey marshmallow? Pure childhood joy, but with a funfetti-like twist from the colorful loops.
- Party Ready: I’ve brought these to potlucks, birthday parties, and even school bake sales—always the first to disappear.
- Stays Fresh: Honestly, they keep well in an airtight container for days, so I can make a batch on Sunday and snack all week.
Step-by-Step Instructions for Fruit Loop Rice Crispy Treats
Master the technique for vibrant, crispy treats with a perfect marshmallow bind.
Step 1: Prepare the Pan and Melt the Butter
Begin by lightly greasing a 9×13-inch baking pan with the 1 tsp Vegetable Oil. I use a paper towel to spread it evenly across the bottom and sides, ensuring the finished treats won’t stick. This thin layer creates a barrier without adding excess grease.
In a large, heavy-bottomed pot, melt the 0.25 cup Unsalted Butter over low heat. Watch for the edges to start foaming and the butter to turn completely liquid with no solid pieces remaining. This gentle melting prevents browning and preserves the clean, buttery flavor essential for this recipe.
Step 2: Bloom Marshmallows with Vanilla and Salt
Add all 10 oz Mini Marshmallows to the melted butter. I stir constantly with a silicone spatula, making sure to scrape the bottom of the pot to prevent scorching. The marshmallows will begin to soften and collapse after 2-3 minutes, transforming into a smooth, glossy liquid.
Once fully melted, immediately stir in the 1 tsp Vanilla Extract and 0.25 tsp Salt. The vanilla deepens the sweetness while the salt balances the sugar, creating a more complex flavor profile. Remove the pot from heat at this stage to prevent overheating the marshmallow mixture.
Step 3: Incorporate Cereal and Optional Sugar
Working quickly, add all 6 cups Fruit Loops Cereal to the marshmallow mixture. I use a folding motion to ensure every piece gets evenly coated without crushing the cereal. The vibrant colors will begin to soften slightly as they absorb the warm marshmallow, but maintain their distinct hues.
For those preferring extra sweetness, sprinkle the 2 tbsp Granulated Sugar over the cereal mixture and fold once more. This addition enhances the caramelized notes in the finished treats. The mixture should look glossy with no dry cereal visible at this point.
Step 4: Press and Set for Perfect Texture
Transfer the mixture to the prepared pan and use the greased spatula to press it into an even layer. I apply firm, consistent pressure across the surface for 30-45 seconds to compact the treats. This compression ensures they hold together when sliced while maintaining a satisfying crispness.
Avoid overworking the mixture in the pan, as excessive pressing can make the treats dense rather than light and crispy. The surface should appear slightly sticky but set enough to hold its shape when lightly touched.
Step 5: Cool and Cut into Servings
Allow the treats to cool at room temperature for 1 hour before slicing. This resting period lets the marshmallow fully set and bind the cereal together. I check for doneness by gently pressing the surface—it should spring back slightly without sticking to my finger.
Using a sharp knife lightly coated with oil, cut into 16 equal squares for the 4 servings. Each piece should have clean edges and maintain its shape when lifted. The treats will keep their crisp texture for up to 3 days stored in an airtight container at room temperature.
Pro Tips For Making Fruit Loop Rice Crispy Treats
- Melt Butter Low: Keep the heat at medium-low when melting the butter—high heat can burn the sugar in the marshmallows before they even start melting, leaving you with a bitter, grainy mess.
- Use Fresh Marshmallows: Stale mini marshmallows won’t melt as smoothly, so check the bag’s freshness date; the softer they are, the easier they’ll blend with the Fruit Loops for that classic gooey texture.
- Skip the Overmixing: Once the cereal is coated, stop stirring—overworking the mixture crushes the Fruit Loops and turns your treats into a dense, colorful brick instead of light, crispy squares.
- Press Gently: Use a buttered spatula or your hands (lightly greased) to press the mixture into the pan, but don’t compact it too hard—this keeps the treats airy and easier to cut later.
Best Sauces and Condiments for These Flavors
Chocolate Drizzle
Melt ½ cup chocolate chips with 1 tsp coconut oil in 30-second intervals in the microwave. Stir until smooth, then drizzle over cooled treats. I use Ghirardelli semi-sweet chips for rich flavor. The coconut oil keeps the chocolate glossy and easy to drizzle. 💫
Vanilla Glaze
Whisk 1 cup powdered sugar, 2 tbsp milk, and ½ tsp vanilla extract until smooth. Drizzle over squares and let set for 15 minutes. This adds a sweet, creamy contrast to the crunchy cereal base.
Caramel Sauce
Warm ¼ cup store-bought caramel sauce in the microwave for 20 seconds. I recommend Smucker’s for its thick consistency. Drizzle lightly—its rich sweetness pairs perfectly with the fruity cereal notes.
Citrus Zest
Sprinkle 1 tsp orange or lemon zest over the treats just before serving. The bright citrus aroma cuts through the sweetness. Use a microplane for fine, fluffy zest that adheres well to the marshmallow surface.
Yogurt Dip
Mix ½ cup Greek yogurt with 1 tbsp honey and a pinch of cinnamon. Serve as a creamy dip alongside the treats. The tangy yogurt balances the sugar, making it a hit with kids and adults alike.
Sprinkle Topping
Press 2 tbsp rainbow sprinkles into the top of the treats right after pressing into the pan. I use Betty Crocker rainbow jimmies for extra color pop. This adds texture and visual appeal without changing the flavor. ✨
Nutrition Facts
Frequently Asked Questions
Can I use regular marshmallows instead of mini?
Yes, but chop them into smaller pieces first for even melting. Mini marshmallows dissolve faster and more uniformly in the 2-3 minutes on the stove.
How do I keep the colors from bleeding?
Work quickly when mixing and avoid overstirring. Pressing the mixture gently into the pan helps maintain the vibrant hues. Let cool completely before slicing.
Can I make these ahead of time?
Store in an airtight container at room temperature for up to 3 days. For longer storage, freeze for up to 2 months and thaw before serving.
Why did my treats turn out hard?
Overcooking the marshmallow mixture or pressing too firmly can make them dense. Melt marshmallows just until smooth and press lightly for a crisp texture.

- Fried Rice Mix Recipe: Customizable Pantry Staple for Quick Meals - October 6, 2026
- Fruit Loop Rice Crispy Treats Recipe: Colorful Crunch With Marshmallow Magic - October 6, 2026
- Erewhon Rice Balls Recipe: Copycat Crispy and Creamy Bites - October 6, 2026