
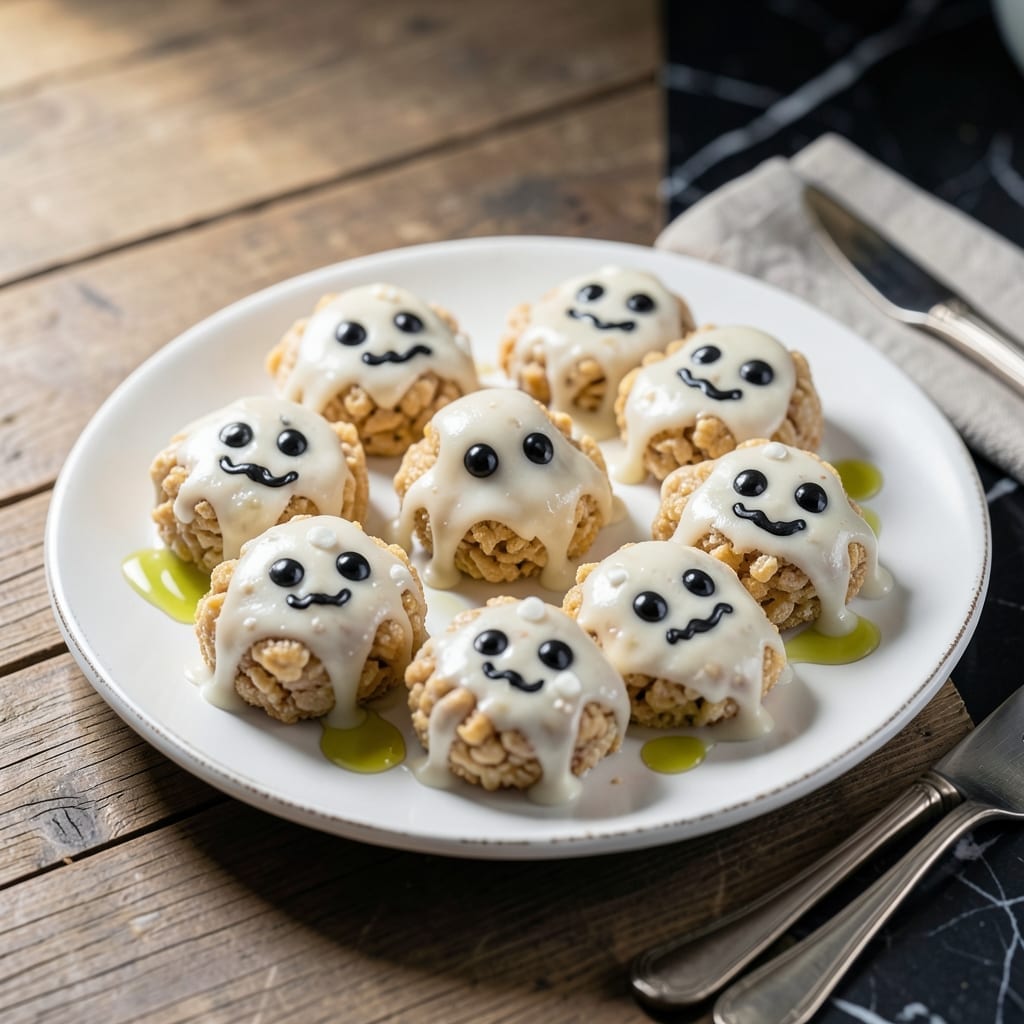
These festive treats transform classic Rice Krispie squares into adorable ghosts with minimal effort. The secret lies in shaping the marshmallow mixture while warm and using simple decorative touches for spooky character.
You’ll achieve perfectly crispy, chewy centers with a ghostly white coating. This method guarantees consistent results every time, making it ideal for Halloween parties or fun family baking sessions.
Ingredients for Ghost Rice Krispie Treats
Transform classic ingredients into spooky Halloween treats with minimal effort and maximum fun.
| Ingredient | Amount | Notes |
|---|---|---|
| Rice Krispies Cereal 🥣 | 6 cups | Fresh for maximum crispiness |
| Mini Marshmallows 🍬 | 10 oz | Or 40 regular marshmallows |
| Unsalted Butter 🧈 | 3 tbsp | For melting with marshmallows |
| White Chocolate Chips 🍫 | 1 cup | For ghostly coating |
| Vegetable Shortening 🧈 | 1 tsp | Helps chocolate melt smoothly |
| Black Food Gel ⚫ | 1 tsp | For drawing ghost faces |
| Vanilla Extract 🌿 | ½ tsp | Pure extract preferred |
| Salt 🧂 | ¼ tsp | Fine grain for balance |
| Powdered Sugar 🍚 | ½ cup | Optional for dusting |
| Coconut Oil 🥥 | 1 tsp | Alternative to shortening |
The marshmallows are critical here. Jet-Puffed or Kraft brands melt most smoothly, but any mini marshmallows will work. For the white chocolate, Ghirardelli or Guittard provide the best melt without seizing. Use fresh Rice Krispies—stale cereal makes the treats chewy rather than crisp. The butter should be unsalted to avoid overpowering the sweetness (Land O’Lakes is a reliable choice).
No white chocolate chips? White candy melts work just as well and are often easier to find. For the black decorations, edible food markers can replace the gel (easier for beginners). Vegetable shortening can be swapped with coconut oil at a 1:1 ratio. If you’re avoiding dairy, use vegan butter—just ensure it’s unsalted and has a similar fat content.
Store treats in an airtight container at room temperature for up to 3 days. The white chocolate coating softens in heat, so keep them cool. For longer storage, freeze for up to 1 month—thaw at room temperature for 30 minutes before serving.
Why You’ll Love This Recipe
- 5-Minute Magic: I melt the butter and marshmallows in one pot, dump in the cereal, and we’re basically done. Honestly, it’s faster than ordering takeout.
- Melt-in-Mouth White Chocolate: That combo of gooey mini marshmallows with creamy white chocolate chips coating every crispy bite? Ridiculously good.
- Halloween Party Hero: Between us, these ghost-shaped treats disappear first at every class party—kids and adults alike.
- Budget-Friendly Batch: A box of cereal, a bag of marshmallows, and I’m feeding a crowd for under $10. Leftovers? Not a chance.
Step-by-Step Instructions for Ghost Rice Krispie Treats
Transform simple ingredients into adorable spooky treats with this precise, professional method.
Step 1: Melt Butter and Marshmallows to Perfect Consistency
In a large pot, melt the 3 tbsp Unsalted Butter over low heat. I prefer a heavy-bottomed pot to prevent hot spots. Once melted, add the 10 oz Mini Marshmallows and stir constantly with a silicone spatula.
The mixture is ready when it becomes completely smooth with no visible marshmallow lumps, about 5-7 minutes. Remove from heat immediately—overheating will make the marshmallows tough and your treats dense instead of light and crispy.
Stir in the 0.25 tsp Salt and 0.5 tsp Vanilla Extract to enhance flavor depth. This small step makes a noticeable difference in the final taste profile.
Step 2: Incorporate Rice Krispies Cereal with Care
Working quickly before the marshmallow mixture sets, add all 6 cups Rice Krispies Cereal to the pot. Use a gentle folding motion to coat every piece evenly. I find that using a spatula and pressing down lightly helps distribute the marshmallow mixture without crushing the cereal.
You’ll know it’s properly mixed when every piece of cereal glistens with the marshmallow coating and no dry spots remain. Avoid compacting the mixture—keep it light and airy for the best texture.
Step 3: Shape and Cool the Treats
Transfer the mixture to a parchment-lined 9×13-inch baking dish. Press it down gently with buttered hands or a buttered spatula to create an even layer. Don’t press too firmly—this maintains the signature crispy texture.
Let the treats cool at room temperature for 30 minutes until completely set. You’ll feel resistance when pressing lightly on the surface, indicating they’re ready for the next step. For faster cooling, you can refrigerate for 15 minutes, but don’t skip the cooling entirely.
Step 4: Create the Ghostly White Chocolate Coating
In a microwave-safe bowl, combine the 1 cup White Chocolate Chips with either the 1 tsp Vegetable Shortening or 1 tsp Coconut Oil. Microwave in 30-second intervals, stirring between each, until completely melted and smooth, about 1-1.5 minutes total.
Dip each cooled Rice Krispie treat into the white chocolate, coating all but the bottom surface. Place on parchment paper to set. The chocolate should coat smoothly without running off the treats.
Step 5: Decorate with Spooky Ghost Faces
Once the white chocolate has set (about 10-15 minutes), use the 1 tsp Black Food Gel to draw ghostly faces on each treat. A toothpick works perfectly for this fine detail work. Allow the food gel to dry completely before handling.
For an optional finishing touch, dust with 0.5 cup Powdered Sugar using a fine mesh sieve. This creates a subtle snowy effect that enhances the ghostly appearance without overpowering the flavor.
Pro Tips For Making Ghost Rice Krispie Treats
- Melt Low and Slow: I learned this the hard way—melting the butter and marshmallows over medium-low heat prevents scorching and gives you that smooth, creamy base for your ghost shapes.
- Use Fresh Marshmallows: After one sad batch with stale marshmallows, I now check the bag date—fresh mini marshmallows melt evenly and bind the cereal better for clean ghost shapes.
- Skip the Overmixing: Stir just until the cereal is coated, then stop—overworking the mixture makes the treats dense instead of light and crispy.
- Add Shortening to Chocolate: Mix 1 teaspoon of vegetable shortening into the white chocolate chips before melting—it thins the coating just enough to drizzle smoothly over your ghost treats.
Flavor Customization for These Flavors
Colorful Ghost Variations
Swap white chocolate for colored candy melts to create pastel ghosts. Wilton candy colors work perfectly—add ½ tsp of gel to 1 cup melted candy melts for vibrant hues. I love using soft pink or purple for a whimsical touch. 🌈
Flavored Coating Twist
Add ½ tsp almond extract to the melted white chocolate for a nutty flavor that pairs beautifully with the marshmallow. For chocolate lovers, mix in 1 tbsp cocoa powder to create ghostly brown spirits. Stir thoroughly to avoid clumping.
Glow-in-the-Dark Ghosts
Use neon food coloring in the candy melt coating for a spooky glow effect under blacklight. McCormick neon colors provide the brightest results. Apply a thin layer and let it set completely before adding the black gel faces.
Mini Ghost Bites
Instead of large squares, shape the mixture into 1-inch balls before dipping. These mini ghosts are perfect for party platters. Use a small cookie scoop for consistent sizing, and dip the tops only for a floating ghost effect.
Sprinkle Decorations
Press Halloween-themed sprinkles into the white chocolate coating before it sets. Betty Crocker seasonal sprinkles add festive texture and color. For extra crunch, add crushed Oreo cookies as ghostly “dirt” around the base. ✨
Flavored Marshmallow Mix
Add 1 tsp pumpkin spice or ½ tsp cinnamon to the melted marshmallow mixture for a seasonal twist. The warm spices complement the sweetness beautifully. I recommend Penzeys spices for the freshest flavor.
Nutrition Facts
Frequently Asked Questions
Can I use regular marshmallows instead of mini?
Yes! Use 40 regular marshmallows to replace 10 oz mini. They melt the same way, just take slightly longer to dissolve completely. Stir constantly to avoid burning.
How do I keep the white chocolate from seizing?
Add 1 tsp shortening or coconut oil per 1 cup chips and melt in 30-second bursts, stirring between each. Avoid water contact—it causes clumping.
What’s the best way to shape the ghosts?
Use buttered hands to form ovals while the mixture is still warm. For mini ghosts, roll into 1-inch balls before dipping. Let cool completely before decorating.
How far ahead can I make these?
Store in an airtight container at room temperature for up to 3 days. For longer storage, freeze for up to 1 month and thaw at room temperature.

- El Pollo Loco Spanish Rice Recipe: Smoky Tomato-Infused Side Dish - October 11, 2026
- Fresh Black Beans and Rice Recipe: Latin-Inspired One-Bowl Heartiness - October 11, 2026
- Empire Ghee Rice Recipe: Fragrant Basmati With Golden Clarity - October 11, 2026