
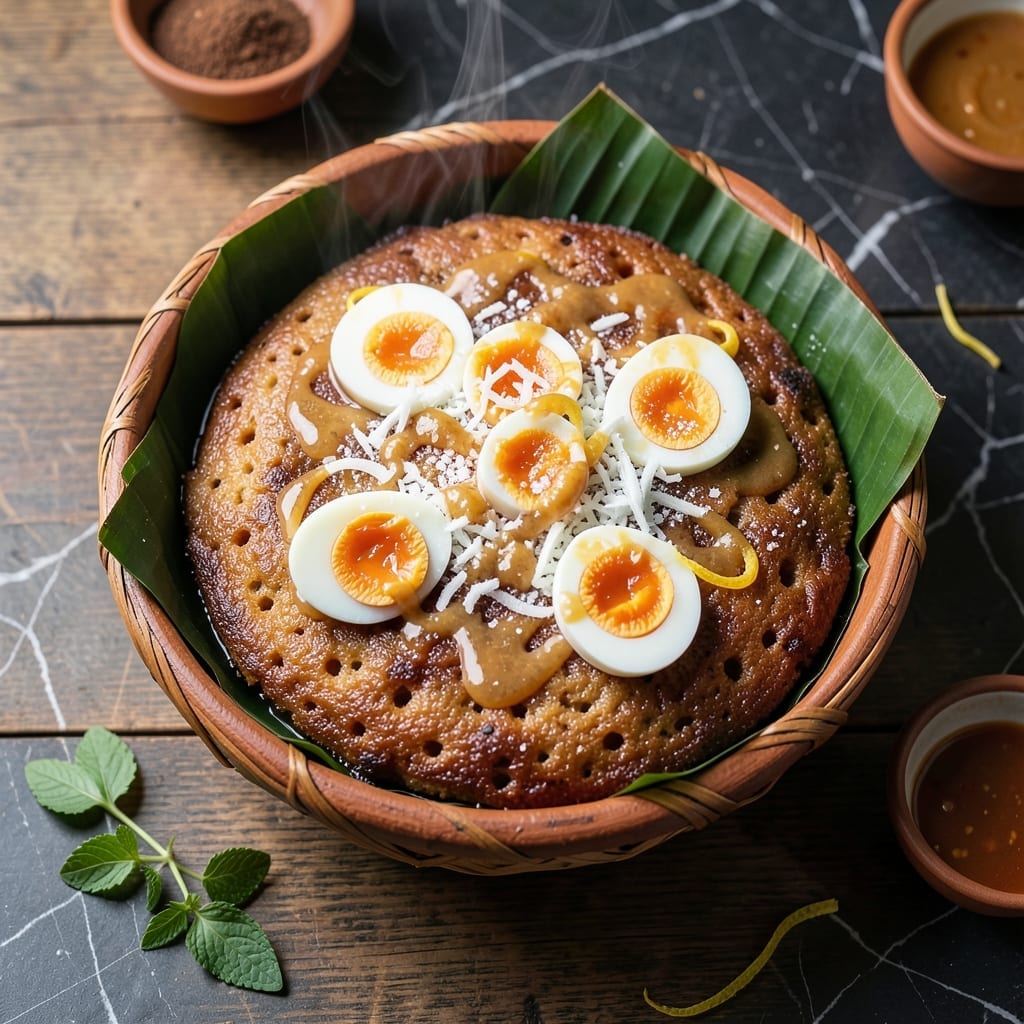
This traditional Filipino dessert captures the essence of holiday mornings with its charred coconut aroma and soft, chewy texture. The clay pot method creates that signature smoky edge while coconut milk lends rich, creamy sweetness.
I’ve refined this version to work with standard kitchen tools, maintaining the authentic taste and warm, comforting appeal. Serve it fresh with a pat of butter and a sprinkle of sugar for the full experience.
Ingredients for Glutinous Rice Bibingka Recipe with Coconut Milk
Rich coconut and glutinous rice flour create this comforting Filipino dessert with authentic charred aroma.
| Ingredient | Amount | Notes |
|---|---|---|
| Glutinous Rice Flour 🌾 | 2 cups | Also called sweet rice flour |
| Coconut Milk 🥥 | 2 cups | Full-fat for creaminess |
| Granulated Sugar 🍚 | 1 cup | Adjust to taste preference |
| Baking Powder 🧂 | 1 tbsp | For slight lift in texture |
| Salt 🧂 | ½ tsp | Balances sweetness |
| Large Eggs 🥚 | 2 whole | Room temperature preferred |
| Unsalted Butter 🧈 | ½ cup | Melted, plus extra for topping |
| Fresh Coconut 🥥 | ½ cup | Shredded, for topping |
| Banana Leaves 🌿 | 2 pieces | Optional, for lining pan |
| Vanilla Extract 🌿 | 1 tsp | Pure extract recommended |
| Coconut Sugar 🥥 | ¼ cup | For topping sprinkle |
Glutinous rice flour is non-negotiable here—regular rice flour won’t give you that signature chewy texture. Look for it in the Asian aisle at H Mart or Seafood City, or order from Amazon. The coconut milk should be full-fat for that rich, creamy base. I always use Thai Kitchen or Aroy-D brands (the texture is consistently good). Fresh coconut for topping? Worth the effort if you can find it.
No banana leaves? Parchment paper works fine for lining—just won’t get that subtle smoky note. Out of coconut milk? Half-and-half with a splash of coconut extract in a pinch (but texture won’t be the same). The eggs can be swapped for flax eggs if needed, though the texture differs slightly. For extra richness, coconut cream instead of milk takes this over the top.
Store leftovers covered at room temperature for 2 days or refrigerate for up to 5 days. Reheat in a skillet to revive that charred edge. Best served warm with extra butter melting on top (trust me on this part).
Why You’ll Love This Recipe
- One Bowl Wonder: I just mix the glutinous rice flour, coconut milk, sugar, and a pinch of salt—no fancy steps, no fuss.
- Coconut Dream: The coconut milk makes it rich and slightly sweet, with that perfect chewy texture from the glutinous rice flour.
- Breakfast or Dessert: Honestly, I serve it warm for breakfast with a pat of butter or as a sweet treat after dinner—it works both ways.
- Budget Stretcher: A bag of glutinous rice flour and a can of coconut milk go a long way, and leftovers taste just as good the next day.
Step-by-Step Instructions for Glutinous Rice Bibingka With Coconut Milk
Master this traditional clay pot method for authentic charred edges and custardy texture.
Step 1: Prepare the Clay Pot and Banana Leaves
Preheat your clay pot in a 350°F oven for 15 minutes to ensure even heat distribution. While warming, briefly pass the 2 pieces Banana Leaves over a low flame for 10-15 seconds per side to soften them and release their aroma.
Line the preheated clay pot with the prepared banana leaves, pressing them to conform to the shape. This layer imparts the distinctive smoky fragrance and prevents sticking. The leaves should slightly overhang the edges for easy removal later.
Step 2: Create the Bibingka Batter
In a large bowl, whisk together the 2 cups Glutinous Rice Flour, 1 cup Granulated Sugar, 1 tbsp Baking Powder, and 0.5 tsp Salt until fully combined. I sift the dry ingredients first to eliminate lumps and ensure a smooth batter.
Make a well in the center and add the 2 whole Large Eggs, 2 cups Coconut Milk, melted 0.5 cup Unsalted Butter, and 1 tsp Vanilla Extract. Whisk vigorously until the mixture achieves a pancake-like consistency with no visible streaks of flour.
Step 3: Bake with Charred Top Technique
Pour the batter into the banana leaf-lined clay pot, filling it about ¾ full. Place the pot on the center rack of your 350°F oven. Bake for 40 minutes until the edges set and the center remains slightly jiggly.
For the signature charred top, switch the oven to broil and position the pot 6 inches from the heating element. Broil for 3-5 minutes, rotating occasionally, until the surface develops dark golden spots and a smoky aroma fills your kitchen. Watch closely to prevent burning.
Step 4: Add Toppings and Final Touches
Remove the bibingka from the oven and immediately brush the top with additional melted unsalted butter. Sprinkle evenly with the 0.5 cup Fresh Coconut and 0.25 cup Coconut Sugar for textural contrast and caramelized sweetness.
Return to the broiler for 1-2 minutes just until the coconut turns light golden brown and the sugar begins to bubble. This final step enhances the visual appeal and adds a delightful crunch to each serving.
Step 5: Rest and Serve
Let the bibingka rest in the clay pot for 10 minutes to allow the structure to set. This waiting period makes it easier to slice cleanly and helps the flavors meld together.
Use the overhanging banana leaves to lift the bibingka from the pot. Slice into 8 wedges and serve warm, allowing each portion to retain its share of the crispy top layer and custardy interior. The contrast between the charred surface and tender base defines this classic Filipino treat.
Pro Tips For Making Glutinous Rice Bibingka Recipe With Coconut Milk
- Preheat the Pan: I learned this the hard way—always heat your pan for 2-3 minutes before pouring the batter. A hot surface guarantees that golden crust on the bottom without sticking.
- Use Full-Fat Coconut Milk: Skip the light versions; full-fat coconut milk gives the bibingka its rich, creamy texture. The extra fat actually changes the outcome.
- Don’t Overmix: Stir just until the batter is smooth—overmixing develops the gluten in the rice flour, making your bibingka dense instead of light and fluffy.
- Cover While Cooking: After pouring the batter, cover the pan for 3-4 minutes to trap steam. This makes a real difference in cooking the center evenly without burning the edges.
Essential Equipment for Great glutinous rice bibingka recipe with coconut milk
Traditional Clay Pot
A 9-inch clay baking pot is ideal for authentic bibingka, creating that signature charred aroma. I found mine at Asian markets for under $15. Soak it in water for 30 minutes before first use to prevent cracking. 💡
Banana Leaf Prep
Fresh banana leaves are available frozen at Filipino grocery stores like Seafood City. Thaw, rinse, and briefly char over a flame to release their fragrance. No leaves? Parchment paper works but lacks that smoky note.
Mixing Essentials
A large mixing bowl and whisk are your best friends for lump-free batter. I prefer stainless steel bowls—they’re durable and easy to clean. A fine-mesh sieve helps sift dry ingredients for ultra-smooth texture.
Oven Thermometer
An oven thermometer ensures your 350°F setting is accurate. Many home ovens run hot or cold. I use a Taylor precision thermometer for $10—it’s a game-changer for consistent results. 🌡️
Serving Tools
A thin, sharp knife or pizza cutter makes clean slices through the chewy texture. I love my 8-inch Wüsthof for precision. Serve on a wooden board to maintain the traditional presentation.
Butter Brush
A silicone pastry brush is perfect for evenly coating the top with melted butter. It handles high heat better than bristle brushes. I keep one dedicated just for baking tasks like this.
Nutrition Facts
Frequently Asked Questions
Can I make this without a clay pot?
Use a 9-inch cake pan or cast iron skillet instead. The texture will be slightly different but still delicious. Just ensure your oven is preheated to 350°F for even cooking.
Why did my bibingka turn out dense?
This usually happens if the batter was overmixed or the baking powder wasn’t fresh. Whisk just until combined, and check your leavening agent’s expiration date. A 1 tbsp measure of fresh baking powder is key for the right texture.
Can I use regular rice flour instead?
No, glutinous rice flour is essential for the chewy texture. Regular rice flour will give you a crumbly result. Look for it in Asian markets or online if your local store doesn’t carry it.
How do I store leftovers?
Keep in an airtight container at room temperature for 2 days or refrigerate for up to 5 days. Reheat in a skillet to restore that charred edge before serving.

- Gobi Fried Rice Recipe: Spiced Cauliflower Wok Delight - October 8, 2026
- Glutinous Rice Roll Recipe: Chewy Pillows With Savory Fillings - October 8, 2026
- Garlic Jasmine Rice Recipe: Fragrant Grains with Aromatic Depth - October 8, 2026