
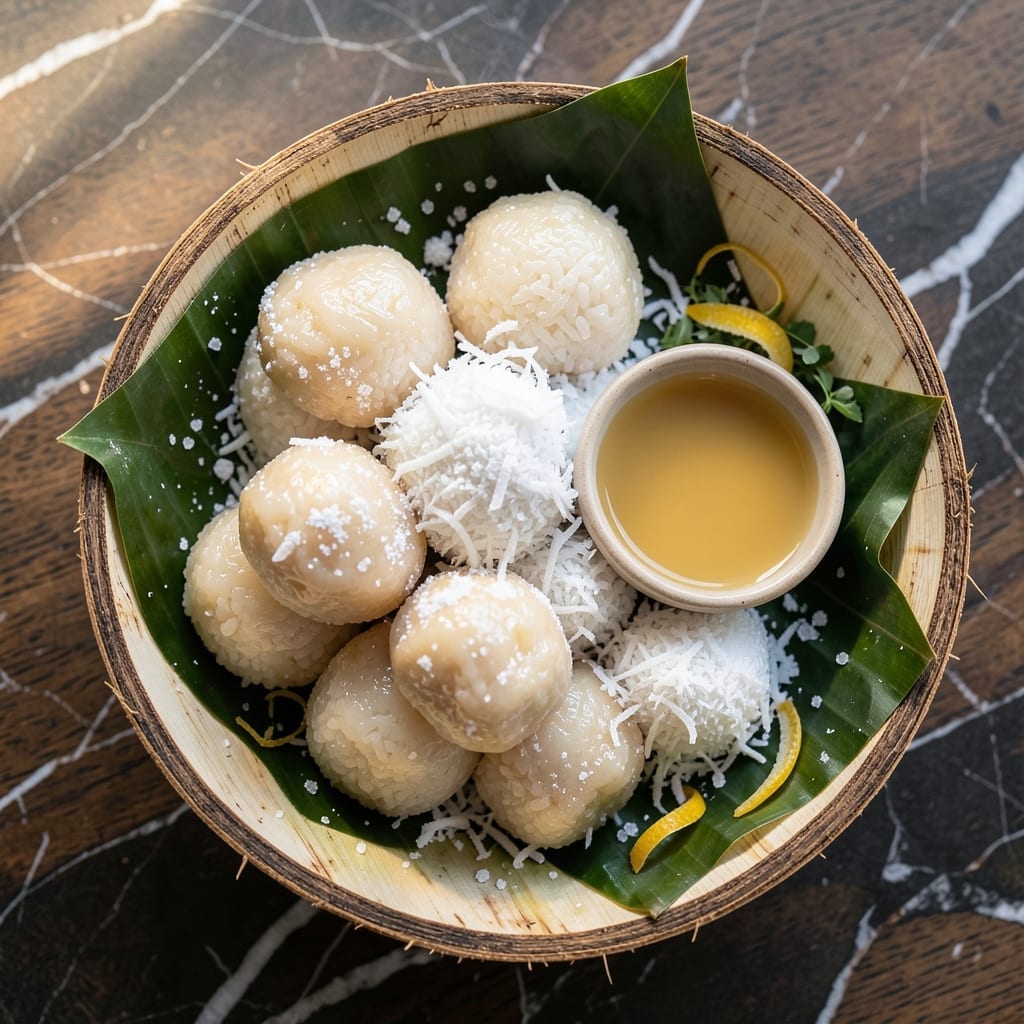
These tender, coconut-coated rice balls bring a taste of Filipino tradition to your kitchen. I developed this recipe after testing multiple variations to achieve the perfect balance of chewy texture and sweet flavor.
The process involves shaping glutinous rice flour into small balls, boiling until they float, then rolling them in freshly grated coconut. The result is a melt-in-your-mouth treat with just the right amount of sweetness.
What makes this version special is the simplicity of ingredients combined with authentic technique. The rice balls develop a slightly elastic texture during cooking, while the coconut coating adds a pleasant contrast.
Serve warm for the best experience, when the coconut clings perfectly to each bite. This dish captures the essence of Filipino dessert-making with straightforward preparation.
Ingredients for Filipino Sweet Rice Balls
Simple, authentic ingredients create these traditional Filipino coconut-coated rice balls with perfect chewy texture.
| Ingredient | Amount | Notes |
|---|---|---|
| Glutinous Rice Flour 🌾 | 2 cups | Mochiko brand preferred for texture |
| Water 💧 | 1 ½ cups | Warm for easier mixing |
| Granulated Sugar 🍚 | ½ cup | Adjust to taste preference |
| Salt 🧂 | ¼ tsp | Fine grain for even distribution |
| Freshly Grated Coconut 🥥 | 2 cups | Unsweetened, for coating |
| Coconut Milk 🥛 | ½ cup | Full-fat for richness |
| Brown Sugar 🟤 | ¼ cup | For coconut coating mixture |
| Vanilla Extract 🌿 | 1 tsp | Pure extract for best flavor |
| Pandan Extract 🌿 | ½ tsp | Optional but authentic |
| Cornstarch 🌾 | 2 tbsp | For dusting work surface |
The glutinous rice flour is non-negotiable—Mochiko brand delivers the ideal elastic texture. Most Asian markets carry it in the baking aisle, but Amazon works too if you’re in a pinch. Freshly grated coconut is worth the effort (the pre-shredded kind lacks moisture). If you can’t find fresh, unsweetened frozen coconut works, just thaw and drain well.
No pandan extract? Skip it—the vanilla still gives great flavor. For a shortcut, coconut cream powder (mixed with water) can replace both coconut milk and grated coconut in the coating. Brown sugar can be swapped for white, but the caramel notes add depth. The cornstarch prevents sticking while shaping—don’t skip this step.
Store rice balls in an airtight container at room temperature for 2 days. For longer storage, refrigerate up to 1 week. Reheat by steaming briefly to restore that melt-in-your-mouth texture. The grated coconut coating is best added fresh before serving.
Why You’ll Love This Recipe
- Five-Minute Mix: I just stir glutinous rice flour, water, sugar, and a pinch of salt—no fancy steps, no resting time, and the dough comes together in minutes.
- Coconut Cloud: That freshly grated coconut coats each warm ball, giving a sweet, nutty crunch that melts in your mouth.
- Potluck Star: I bring these to gatherings and they vanish fast—great for parties, merienda, or even a late-night snack.
Step-by-Step Instructions for Filipino Sweet Rice Balls
Master the traditional technique for achieving perfectly chewy centers with fragrant coconut coating.
Step 1: Prepare the Dough Mixture
In a large mixing bowl, combine the 2 cups Glutinous Rice Flour, 0.5 cup Granulated Sugar, and 0.25 tsp Salt. The fine grain salt ensures even distribution throughout the dough, preventing any salty hot spots in your finished rice balls.
Gradually add the 1.5 cups Water while stirring continuously with a wooden spoon. The warm water specified in the ingredients list makes mixing significantly easier. Continue until a smooth, slightly sticky dough forms that pulls away from the sides of the bowl.
Add the 1 tsp Vanilla Extract and 0.5 tsp Pandan Extract to the mixture. The pandan extract, while optional, contributes the distinctive aromatic quality that defines authentic Filipino sweet rice balls. Mix thoroughly until the dough is uniformly colored and fragrant.
Step 2: Shape the Rice Balls
Dust your work surface generously with the 2 tbsp Cornstarch to prevent sticking. Transfer the dough onto the prepared surface. The cornstarch creates a barrier between the dough and your hands, making it easier to handle the naturally sticky glutinous rice flour mixture.
Divide the dough into 24 equal portions (about 1-inch balls for 4 servings). Roll each portion between your palms into a smooth sphere. If the dough sticks to your hands, lightly dust them with additional cornstarch. The balls should be uniform in size for even cooking.
Place the shaped balls on a parchment-lined tray. Cover with a damp kitchen towel to prevent them from drying out while you finish shaping the entire batch. This step is crucial for maintaining the proper moisture content before cooking.
Step 3: Cook the Rice Balls
Bring a large pot of water to a gentle boil. The water should be at a rolling boil but not vigorously bubbling, which could cause the rice balls to break apart. Carefully drop the rice balls into the boiling water in batches, being careful not to overcrowd the pot.
Cook for 15-20 minutes or until the rice balls float to the surface and become translucent. You’ll notice the texture change from opaque to slightly see-through when they’re properly cooked. Stir gently occasionally to prevent sticking to the bottom of the pot.
Using a slotted spoon, transfer the cooked rice balls to a bowl of ice water for 30 seconds to stop the cooking process. Drain thoroughly on a wire rack or paper towels. The rice balls should have a chewy, slightly springy texture when properly cooked.
Step 4: Prepare the Coconut Coating
In a large skillet, combine the 2 cups Freshly Grated Coconut, 0.5 cup Coconut Milk, and 0.25 cup Brown Sugar. The full-fat coconut milk specified in the ingredients list provides the necessary richness for an authentic coating that clings properly to the rice balls.
Cook over medium heat for 5-7 minutes, stirring constantly, until the mixture thickens slightly and the coconut turns a light golden color. The brown sugar will caramelize slightly, adding depth of flavor to the coating. Remove from heat when the mixture resembles wet sand.
The mixture should be moist enough to coat the rice balls but not so wet that it slides off. If it appears too dry, add a small amount of additional coconut milk, one teaspoon at a time, until you reach the desired consistency.
Step 5: Coat and Serve
While the coconut mixture is still warm, add the cooked rice balls to the skillet. Gently toss to coat each ball completely with the coconut mixture. The warmth of the mixture helps it adhere better to the rice balls.
Transfer the coated rice balls to a serving dish. They’re best served warm, when the coconut coating is at its most fragrant and slightly sticky. As they cool, the coating will set slightly, creating a pleasant textural contrast between the chewy interior and the slightly firmer coconut exterior.
For an authentic presentation, arrange the rice balls in a single layer on a platter lined with banana leaves if available. Serve immediately while the coconut coating is still fresh and aromatic.
Pro Tips For Making Filipino Sweet Rice Balls
- Steam Evenly: Use a bamboo steamer lined with cheesecloth to prevent sticking—I learned this the hard way after scraping burnt bits off my first three batches.
- Grate Fresh Coconut: Skip pre-shredded coconut; freshly grated is sweeter and releases more natural oils, which actually changes the outcome.
- Avoid Overmixing: Stir the glutinous rice flour and water just until combined—overworking the dough makes the rice balls tough and chewy.
- Salt the Coconut: Toss the freshly grated coconut with a pinch of salt before rolling the balls in it; this small step balances the sweetness perfectly.
Best Sauces and Condiments for This Recipe
Sweet Coconut Syrup
Simmer 1 cup coconut milk with ½ cup brown sugar and 1 tsp vanilla until thickened. This syrupy glaze adds extra richness when drizzled over warm rice balls. I often make a double batch to store in the fridge for up to 1 week. 💛
Mango-Chili Dip
Blend 1 ripe mango with 1 tbsp lime juice, 1 tsp chili flakes, and 1 tsp honey for a sweet-spicy contrast. The acidity cuts through the coconut’s richness beautifully. Use fresh mango for the best texture.
Pandan Coconut Sauce
Heat ½ cup coconut cream with 2 tsp pandan extract and 2 tbsp sugar until dissolved. This fragrant green sauce enhances the dish’s authentic Filipino profile. Drizzle lightly—its flavor is intense.
Chocolate Drizzle
Melt ½ cup dark chocolate with 2 tbsp coconut oil for a smooth, glossy topping. The bitterness balances the sweetness perfectly. I use Ghirardelli 70% for consistent quality.
Toasted Coconut Flakes
Dry-toast 1 cup coconut flakes in a pan over low heat until golden. Sprinkle over finished rice balls for added crunch and nutty depth. Watch closely—they burn quickly.
Latik Topping
Cook 1 cup coconut milk on medium-low heat until solids separate, then fry until golden. This traditional Filipino coconut curd adds a caramelized, slightly salty contrast. 🔥
Nutrition Facts
Frequently Asked Questions
Can I use regular rice flour instead of glutinous?
No, regular rice flour won’t give the same chewy texture. Glutinous rice flour is essential for that signature stretchy, elastic bite. Substituting will result in a crumbly or grainy consistency.
How do I prevent the rice balls from sticking together?
Dust your hands and work surface generously with cornstarch while shaping. After cooking, cool them on a wire rack in a single layer before coating. This keeps them separate and easy to handle.
Can I make these ahead of time?
Yes! Shape and refrigerate uncooked balls for up to 24 hours before boiling. Store cooked and coated ones in an airtight container at room temperature for 2 days, or refrigerate for 1 week.
Why did my rice balls crack while cooking?
Cracking usually means the dough was too dry or the water wasn’t boiling gently. Ensure your dough is smooth and slightly sticky, and avoid overcrowding the pot. Stir occasionally for even cooking.

- Five Spice Rice Recipe: Aromatic Grains With Warm Spice Balance - October 10, 2026
- Flavoured Basmati Rice Recipe: Aromatic Grains with Spiced Depth - October 10, 2026
- Fish Porridge Rice Cooker Recipe: Hands-Free Congee With Silky Depth - October 10, 2026